

Welcome to our technical guide on adjusting the object selection behavior in cadvilla. In this video tutorial, we show you how to define and edit the selection settings to match your personal drafting workflow. Furthermore, we explain how to modify the visual representation of marked elements, adjust the size of selection handles, and filter specific object types. Consequently, mastering these configurations will help you maintain a clean overview and prevent the accidental modification of specific architectural elements.
1. Accessing the Selection Settings
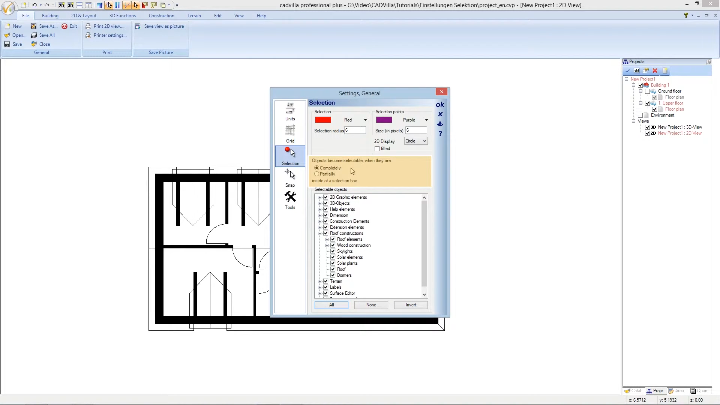
There are two efficient methods to open the configuration menu for your selections.
[0:43] Option 1: Accessing via the Main Menu
- First, navigate to the top-left corner and click on
Main Menu.

- Next, select
Settingsfrom the dropdown menu, followed byGeneral. - Finally, click on
Selectionwithin the opened dialog window to access the specific parameters.
[1:14] Option 2: Accessing via Shortcut Key
- Alternatively, you can simply press the keyboard shortcut
CTRL + SPACE. Therefore, this is the fastest direct method to immediately open yourSelection Settingsdialog box geometry without navigating through the main menu.
2. Overview of the Most Important Settings
[1:26] Visual Representation of the Selection
- Color: Here, you can define the exact color in which a selected object (e.g., a wall or a roof) is displayed. Simply click the color swatch to choose a new color.
- Selection radius: This specific value defines the radius in which objects will be recognized and selected by your mouse cursor. We recommend setting a radius strictly between 5 and 10 pixels.
[2:03] Selection Points (Handles) Selection points are the distinct graphical grip points (e.g., the corners of a defined roof) that appear after selecting an object, allowing you to edit its geometry.
- Color: Choose a high-contrast color for these specific points.
- Size: Define the geometric size of the points in pixels. Again, we recommend a size between 5 and 10 pixels.
[2:32] Selectable Objects (Filter) Inside the „Selectable objects“ area, you will find a structured object tree. Here, you can define exactly which elements you want to select or ignore.
- Utilize the plus and minus symbols to expand or collapse specific categories (e.g., 3D graphic elements or Roof constructions).
- Uncheck the boxes next to certain groups to protect them from unintended selection or movement.
- To reset your filters, simply click the All button to make absolutely all object types selectable again.
[3:12] Behavior of the Selection Box Under the section labeled „Objects become selectable, when they are“, you can define how the rectangular selection frame reacts when drawing a box over multiple elements:
- Completely: The object is only selected if it is entirely located within the drawn selection box. (We highly recommend this setting for precise architectural drafting).
- Partially: The object is selected even if only a small fraction of it intersects with the selection box.
3. Saving the Configurations Permanently
[3:31] Save as Default If you want to keep your applied configuration active for future projects, click the Save as default icon located near the bottom of the window. Consequently, your individual selection settings will automatically load every time you start the software. Press OK to confirm and close the dialog.
4. Practical Examples for Selection
[3:45] Practical Example 1: Selecting a Roof
- By performing a single left click near a roof, the roof becomes selected. Consequently, it is immediately highlighted in your defined selection color (e.g., red), and the selection points (handles) appear in your chosen size and color (e.g., purple, 6 pixels).
- Press the
ESCkey to cancel the active selection.
[4:29] Practical Example 2: Using the Selection Box
- When drawing a selection box around a lower wall with the condition set to
Completely, only the wall entirely enclosed within the frame is marked. Therefore, intersecting roofs and adjacent walls are ignored successfully.
[5:06] Practical Example 3: Applying Object Filters
- First, press
CTRL + SPACEand uncheckRoof constructions,Ceilings, andFloorsinside theSelectable objectstree. - Next, confirm with
OKand draw a large selection box around the entire 3D model. - As a result, all objects are selected and highlighted except for those excluded categories, proving the filter settings calculate correctly. Verify by pressing the
Allbutton later to reset the rules.