

Do you want to work faster and more precisely in your cadvilla projects? In this tutorial, you will learn how to activate and configure the Tool options window for various input functions. This dialog is essential for entering precise numerical values while drawing. Furthermore, we will show you highly effective keyboard shortcuts to streamline your 2D and 3D drawing process. As a result, you can configure exact dimensions and angles on the fly while significantly improving your overall architectural workflow.
Below is a detailed overview of the video’s content and the steps required to optimize your workspace.
1. Define and Save the Display Settings
[00:30] Open the Settings
- To configure the general display settings for the Tool options dialog, you first need to open your project.
- Make sure you are in the main project view.
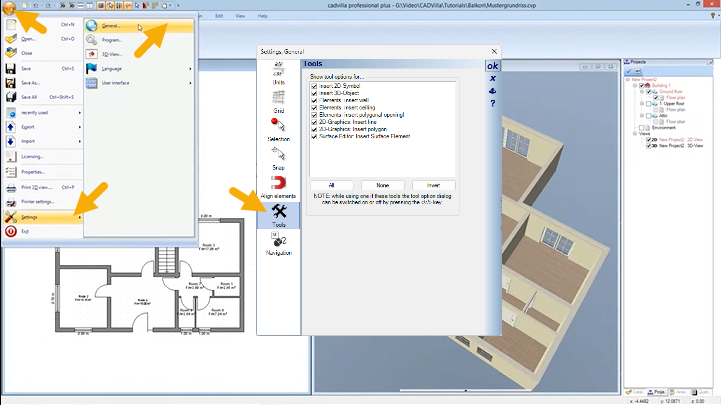
- Then, go to the top-left corner, click the main menu (cadvilla logo/File), and select
Settings>General.... - The general settings dialog window will open immediately.
[00:53] Select the Tools Menu
- On the left-hand side of the newly opened window, locate and click on
Tools. - Here, you will see a specific section labeled
Show tool options for.... - In this list, you can see various input functions (e.g., for walls, 2D symbols, or 3D objects).
[00:59] Select the Tool Options Checkboxes
- You can easily activate or deactivate the dialogue for each respective function by setting or removing the check marks.
- The available options include features like
Insert 2D-Object,Insert 3D-Object,Elements: Insert wall,Elements: Insert ceiling,Elements: Insert polygonal openingl,2D-Graphics: Insert line,2D-Graphics: Insert polygoneandSurface Editor: Insert Surface Element. - Our recommendation: We strongly advise you to check all the boxes to activate the tool options dialog for every input function. Therefore, you will always have maximum control over lengths, distances, and angles.
[02:35] Save as Default
- If you want to use these exact settings for all future projects, you must save them permanently.
- To do this, simply click on the disk icon labeled
Save as default. - Consequently, these settings will automatically apply every time you restart the program.
- Finally, confirm your changes by clicking
OK. - Now, the Tool options window will appear automatically as soon as you draw a wall or position an object.
2. Working with the “Tool options” Window
Example 1 (up to release 10)
The following function works up to release 10 – after it, we have more comfortable functions to change the length.
[03:07] Show and Hide the Window (Shortcut: W)
-
- To understand how this works in practice, select a tool, for example,
Building>Walls>External Wall>Between two points chain. - While you are executing a function, the parameter window might cover an important part of your drawing.
- However, you can easily toggle the Tool options window on or off at any time using the
Wkey. - Simply press
Wto hide the window temporarily, allowing you to click points hidden behind the dialog effortlessly. Press it again to bring it back.
- To understand how this works in practice, select a tool, for example,
[03:41] Switch into the Window (Spacebar)
-
- Whenever you need to manually enter a value, you can quickly jump directly into the Tool options window.
- Just press the
SPACEBAR(Space). - Alternatively, you can always click inside the first input field with your left mouse button.
[03:50] Switch Between Input Fields (TAB Key)
-
- Once you are inside the dialog, you don’t need to use your mouse to navigate.
- Instead, use the
TABkey to quickly jump back and forth between the individual input fields (such asDistanceandAngle). - As a result, your drafting speed will increase significantly.
[03:58] Confirm Entries (ENTER Key)
-
- Have you finished typing your desired value?
- Simply confirm it by pressing the
ENTERkey. The software will immediately apply the exact measurement to your current drawing step.
Example 2:
[04:34] Change the Angle of 3D Objects (Mouse Wheel)
-
- First, insert a 3D object into your view. For instance, navigate to
Catalog>Interior>Tablesand drag a table into your floor plan. - As long as the Tool options window is visible, you have a very convenient way to rotate the object.
- You can change the orientation by simply turning your mouse wheel.
- Furthermore, the
Anglefield inside the dialog updates in real time, and you can even define specificAngle stepsfor precise rotation.
- First, insert a 3D object into your view. For instance, navigate to