


Welcome to our technical guide on positioning 3D objects in walls. In this tutorial, we address common issues that occur when inserting windows, doors, or window constructions into walls composed of multiple short segments. Furthermore, we provide a step-by-step solution to clean up these segments and ensure proper object placement. Consequently, following these methods will streamline your workflow and prevent structural errors.
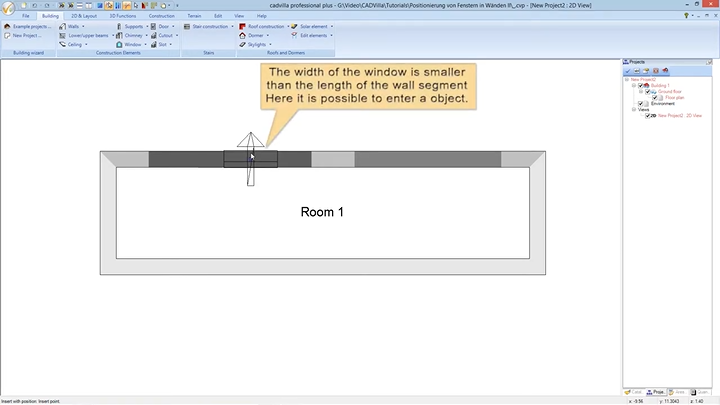
1. The Problem: Object Wider Than Wall Segment
A frequent issue when inserting 3D objects is that they cannot be placed at the desired location within a wall. Generally, the reason for this lies in the underlying structure of the wall itself.
[0:13] The Root Cause
- Visually, a wall might appear as a single, continuous line. However, technically, it can consist of several small individual pieces (segments).
- [0:42] If the length of the wall segment is smaller than the width of the 3D object, you cannot physically place it into the wall.
[1:12] The Error Case
- First, navigate to
Building>Window>Window>Free positioningto select an object. - [1:40] When you attempt to place the window into a wall segment that is too short, the software restricts the placement.
- Consequently, cadvilla displays a red prohibition symbol. Additionally, a yellow warning message appears stating: “The width of the window is larger than the length of the wall segment. Hence we can not place the window in this wall segment.”
2. The Solution: Cleaning Up and Connecting Wall Segments
To place the object freely, you must convert the fragmented wall into a single, continuous wall.
[2:36] Step 1: Deleting Unnecessary Segments
- Initially, locate and select the short wall pieces that interrupt the main wall.
- Next, press the
DELETEkey on your keyboard to remove these segments. As a result, gaps visually appear in your wall structure.
[2:54] Step 2: Trimming the Wall
- Now, you need to connect the remaining wall ends to form a closed wall.
- Navigate to the menu and select
Edit>Edit wall>Trim wall. - [3:10] Alternatively, you can simply press the shortcut key
Bfor the trim wall function. - [3:17] Click sequentially on the two remaining outer segments of the wall that you want to join. Consequently, cadvilla closes the gap automatically and creates a single, long wall segment.
[3:50] Step 3: Placing the Object
- Since the wall now consists of one continuous piece and is sufficiently long, you can position the door or window construction freely at any desired location.
- Finally, press the
ESCkey to finish the positioning process.
3. Summary & Tips
[4:10] Avoid Fragmented Walls
- As a general rule, please avoid walls made out of different wall segments with the same wall thickness. Therefore, ensure you draw continuous walls instead of assembling them from small individual pieces.
[4:22] Basic Sizing Rule
- 3D objects (3D doors, 3D windows, window constructions) can only be inserted in walls or wall segments which are longer than the width of the object. An object has to be smaller than the length of the wall or segment.
[6:04] Important Shortcuts
- Incorporating keyboard shortcuts improves your drafting speed.
B= Trim wall (creates corner connections or joins straight segments)V= Extend / shorten wall (extends a wall along its axis)