

Would you like to plan stairs with a landing in cadvilla exactly according to your individual ideas? Although the automatic stair function is practical, it sometimes delivers undesirable polygonal shapes or deviating heights for landings. In this tutorial, we will therefore show you how to easily construct stairs with a landing manually from two straight stair runs and a landing. This method consequently offers you maximum flexibility for tailor-made stairs in your project. Learn step by step how to define heights, use sweep solids, and texture the stairs perfectly.
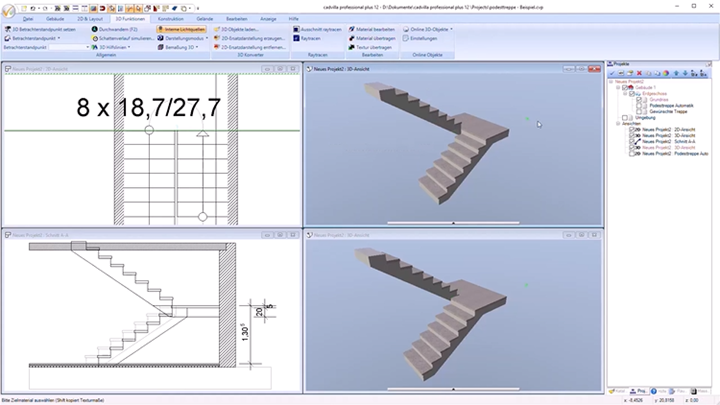
The upper stair is the manually created stair, the lower stair was created automatically
General information on the manual creation of stairs with a landing
- Why manually? The automatic function in cadvilla sometimes provides an undesirable, polygonal landing shape or a deviating height position for the landing.
- With the manual method, you can adjust the shape, height, and position of the landing as well as the stairs precisely. The stairs with a landing consist in this case of two manually created, straight stair runs and a manually entered landing. Doing so gives you a customized stair that fits perfectly into your floor plan.
- Tip: The possibility shown here also works excellently for quarter-turn stairs with a landing or for stairs where the landing should not be exactly centered in height.
1. Create stair runs
Draw the first stair run
- Begin with the construction of the first stair run. To do this, select
Stair construction>Straight Stairin theBuildingmenu. - Set the reference point for the first stair run. Tip: Orient yourself on the snap points of a previously automatically created stair (serving as an auxiliary construction) or on snap points that you have generated through guidelines.
- In the properties dialog of the stair, you now enter the specific dimensions. Define the
tread depth(e.g., 0.27 m) and the height at the exit (e.g.,1.305m). - The number of steps and the step height (e.g., 0.18 m) are calculated automatically by the program.
- Adjust the representation by deactivating the handrail and the stair hole in the dialog. This ensures a better overview.
Draw the second stair run
- Select the Straight Stair function under Building once again.
- Draw the second stair run and place the start point at the desired position.
- In the dialog window, enter the height at the entrance (e.g.,
1.305m – this corresponds exactly to the exit height of the first stair run). The height at the exit usually corresponds to the preset floor height. - Deactivate the representation for handrails and ceiling cut-outs here as well.
2. Construct and adjust the landing
Create a landing as a sweep solid
- For the landing, use the
Extrude Solidfunction in theConstructionarea. - Click on the lower surface of the first stair run in the 3D view to define the reference plane for the landing. The landing is created parallel to this surface.
- Switch to the 2D view and draw a rectangle to define the shape of the landing.
- In the properties dialog of the Extrude solid (right mouse button >
Properties...), enter the height (thickness) of the landing (e.g., 0.20 m). - Subsequently, position the landing precisely in the 2D and 3D view. If necessary, use guidelines for this.
- Note: If you are using one of the smaller basic versions of cadvilla (which do not support
extrude solids), you must construct the landing with asingle 3D Surface(in theconstructionarea).
3. Add and texture the stair covering
Add stair covering and missing surfaces
- To create a stair covering for the landing or to fill in missing lateral surfaces, use the
Extrude Solidfunction again (starting from cadvilla professional). - Draw the required surface in the 2D view and define the depth according to the width of the stair run.
- Define the height of the covering (e.g., 0.05 m for 5 cm) and adjust the position exactly.
- To avoid disturbing lines in the floor plan, you can adjust the 2D representation, for example by setting the line color of the polygon to white (invisible polygons).
Transfer materials and finalize
- Switch to the 3D view to texture the landing and the covering.
- Use the function
3D Functions>Transfer material. First click on the source material (e.g., the floor) and then on the target object (the landing) to adopt the texture. - Repeat this process for all newly created surfaces and coverings.
- Finally, check the position of all elements in the 3D view. Your individual stairs with a landing are now finished!
Conclusion
With this instruction, you can create stairs with a landing in cadvilla without automatic features, tailored perfectly to your requirements. The manual method offers maximum flexibility in designing stair runs, landings, and coverings. Try it out and create your own customized stair!
Tip: The possibility shown here also works excellently for quarter-turn stairs with a landing or for stairs where the landing should not be exactly centered in height.