


Do you want to remove a ceiling slab in your cadvilla project, for example, to create an open gallery area or an airspace? Deleting a ceiling is completed in just a few logical steps. However, it is important to know whether it is a ceiling automatically generated by the program or a ceiling slab drawn by you manually. Therefore, in this short tutorial, we will comprehensively explain both methods. As a result, you can adapt your ceiling constructions quickly and flawlessly directly to your planning wishes.
By default, cadvilla is set up in such a way that a ceiling (the so-called automatic ceiling) is automatically generated simultaneously when a new floor is created. However, this highly practical default setting can certainly be deactivated individually for each floor.
1. Deleting an automatic ceiling
You cannot simply select an automatic ceiling and delete it with the delete key. Instead, you must deactivate the automatic function for the respective floor.
- Go to the project manager (usually found on the right side of the screen).
Right-clickon the corresponding floor (e.g.,Ground floor) specifically in the project tree.- Select the item
Propertiesin the context menu. - A dialog window opens. Here,
remove the checkmarknext to the optionCreate automatic ceiling. - Confirm successfully with
OK. The ceiling is now automatically removed from your 3D model.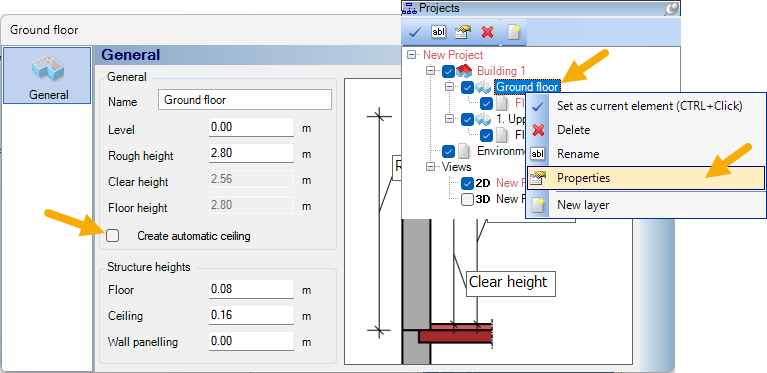
2. Deleting a manually created ceiling
If you have personally drawn a ceiling using the construction tools, you can easily delete it just like any other standard building component.
- First of all, ensure that the layer in which the manually created ceiling is located is set as the active layer. (The active layer is displayed in red within the project manager).
- Now, select the ceiling slab with a single left mouse click.
- Finally, press the
DEL(Delete) key on your keyboard to permanently delete the ceiling.
Tip: How to find the right layer If you do not exactly know in which specific layer the unwanted ceiling slab is located, you can easily figure this out directly in the 3D view:
- Switch to a 3D view of your project.
- Hover the mouse pointer exactly over the corresponding ceiling element and intentionally wait there briefly.
- A small information window (tooltip) subsequently pops up.
- In this window, you can read the exact structure (e.g., Building: Building 1 > Floor: Ground floor > Layer: Roof surroundings).
- Now activate this specific layer in the project manager, so that you can delete the ceiling exactly as described above.
- Tip: If you continuously hold down the
CTRLkey and then successfully click with theleft mouse buttonon the ceiling to be deleted, you will automatically switch right into the correct layer.
