

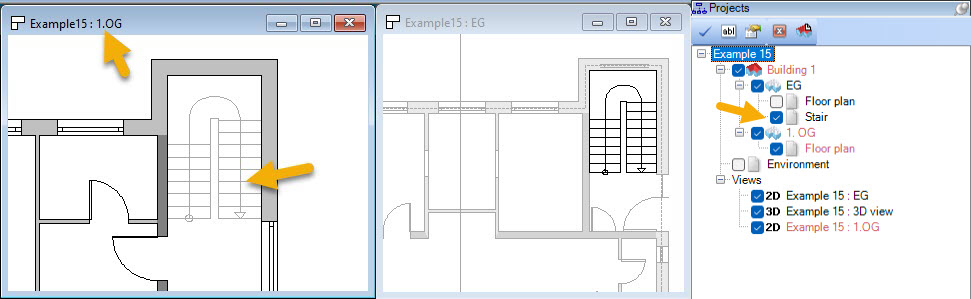
By default, stairs/chimneys are only visible on the floor where they were originally created. In this tutorial, we’ll show you how to easily make stairs and chimneys visible on the floor above. Learn the exact steps to adjust your 2D views and improve your floor plan presentation.
There are two solutions for this:
- The layer technique (Recommended) – Dynamic and flexible.
- The 2D symbol technique – Static, good for quick additions.
Method 1: The layer technique (Recommended)
The most elegant solution is to use the layer management. Changes to the original object are automatically adopted in all views.
Procedure:
- Place object on its own layer: Place the stair or the chimney on the original floor (e.g., ground floor) on a separate layer.
- Activate layer in the target floor: Switch to the floor above (e.g., upper floor). In the visibility settings, switch the layer of the floor below, on which the stair/chimney is located, to “visible”.
- Cover areas: If parts of the stair should not be visible on the upper floor (e.g., below the ceiling), simply place a white-filled 2D polygon or rectangle over it.
Method 2: Display as a 2D symbol (Video Tutorial)
Alternatively, you can save the 2D view of the object as a symbol and insert it as a pure graphic on the upper floor. Note: Since this is a pure 2D graphic, subsequent changes to the 3D model of the stair/chimney are not automatically updated here.
Video Tutorial: Stair and chimney as a 2D symbol on the upper floor: In this video, we show you step by step how to create 2D symbols from 3D objects and position them exactly in the floor above.
The most important steps for Method 2 in the video:
- [00:35] Introduction and short explanation of the solution
- Deactivate the grid and the line width in the upper icon bar.

- Explanation of the solution
- Deactivate the grid and the line width in the upper icon bar.
 [02:00] Save selection as 2D symbol: Select the desired object (e.g., chimney or stair) on the original floor. Click the right mouse button and select
 Save selected objects as 2D Symbol.... Assign a name (e.g., “Chimney Symbol” or “Stair Symbol”) and confirm withOK. Make sure that the file is saved under the “Graphics2D” directory in the cadvilla folder in your own documents (My samples).- [03:16] Insert symbol: Switch to the target floor (e.g., first upper floor). Go to the
Catalog>2D Symbols>Open fileand select your saved symbol. - [04:09] Exact positioning (reference points): To place the symbol congruently with the 3D object, use the
Move with reference pointfunction in the toolbar. Select a prominent corner point on the symbol and the same corner point in the floor plan. - [05:23] Cover areas (masking): To hide parts of the stair, draw a rectangle (
2D & Layout>Rectangle>New rectangle).- Properties: Right-click the rectangle and choose
Properties. Set Fill style =Monochrome, Fill color =White, and Outline =invisible. - Place this rectangle over the areas that should not be visible in the plan.
- Properties: Right-click the rectangle and choose
- [06:51] Check result: Deactivate the ground floor layer to check. The 2D symbol remains as an independent graphic on the current floor.