

Does your floor plan in the 2D or 3D view suddenly appear infinitely small, almost like a blank sheet of paper? This issue in cadvilla is often caused by a single element that has been placed far outside the visible project area (in “infinity”). In this tutorial, we will show you how to locate and remove these unwanted elements. You will learn both the automatic method and a step-by-step manual exclusion process to identify the exact floor, layer, and category of the faulty element. This will quickly restore your views to their correct size and perspective.
Automatic removal of unwanted elements in infinity
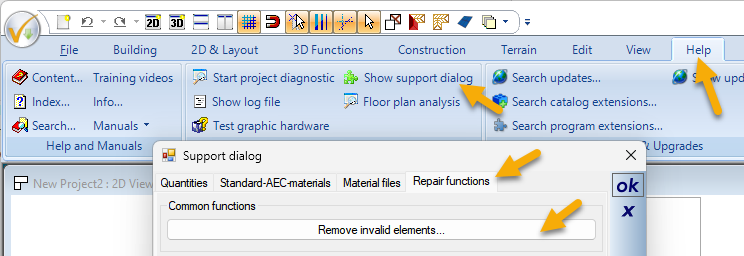
- Go to
Help→Show support dialog→Repair functions→Remove invalid elements.
- If this automatic procedure does not solve the problem, proceed with the manual search for the invalid, unwanted elements.
Manual Search – Preparation
- Open new views:
- Open a new 2D view and press the
Homekey (shortcut for “Show all”). - Open a new 3D view and also press the
Homekey.
- Open a new 2D view and press the
- Distinguish between 2D and 3D elements:
- If the floor plan is only displayed infinitely small in the 2D view, the problem is caused by a 2D element located in infinity (e.g., 2D symbols or elements created with functions under
2D & Layout). Further troubleshooting will then take place in the newly opened 2D view. - If the floor plan is also displayed infinitely small in the 3D view, the problem is a 3D element (3D objects and all elements created with functions under
Building,3D Functions,Construction, orTerrain). Further troubleshooting will then take place in the newly opened 3D view.
- If the floor plan is only displayed infinitely small in the 2D view, the problem is caused by a 2D element located in infinity (e.g., 2D symbols or elements created with functions under
1. Find elements in infinity (Process of elimination)
Step 1: Find the floor with the faulty element
- Go to the view where the troubleshooting should take place (see above).
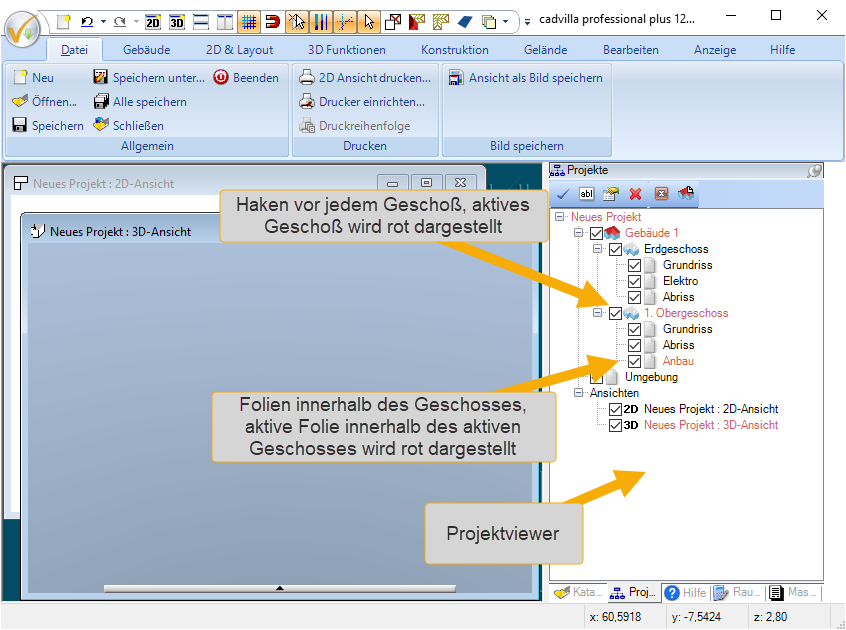
- Deactivate any floor (remove the checkmark in front of the floor in the project viewer) and press
Home. - If the floor plan becomes visible again, the faulty element is located in the deactivated floor.
- Repeat this process until the faulty floor is identified.
- Note: If only one floor is checked in the project viewer and pressing
Homechanges nothing, the error is in this floor. You can cross-check by activating another floor and deactivating the last remaining one. Now, after pressing theHomekey, a floor plan should be displayed.
Step 2: Find the layer with the faulty element
- Within the faulty floor, deactivate the layers one by one and press
Homeeach time until the faulty layer is found (same procedure as finding the floor).
Step 3: Determine the faulty category
- The floor and the layer containing the faulty element are now determined.
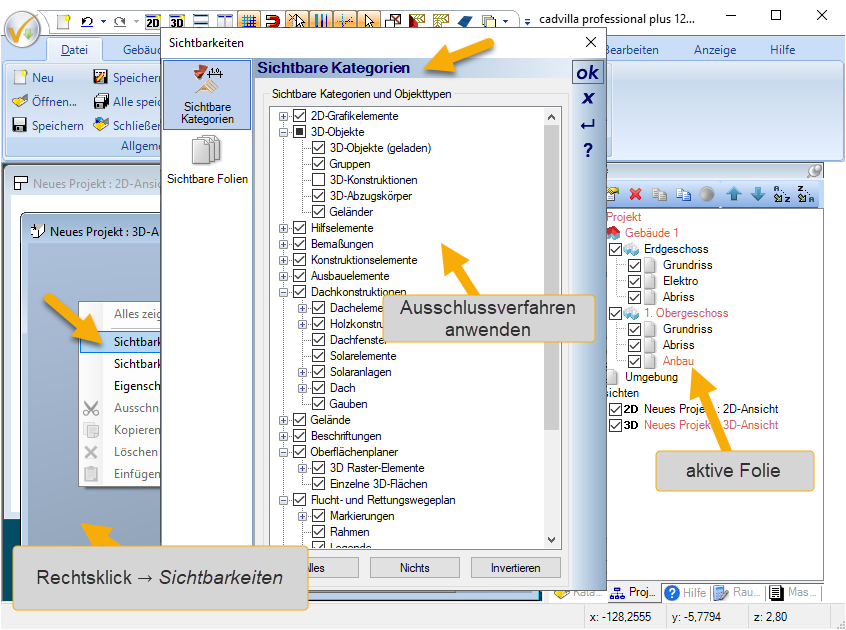
- Activate the layer with the faulty element (Right-click on the layer →
Set as current element). - Open the dialog box for Visibilities (Right-click inside the view →
Visibilities). - Turn off categories one by one to find the category of the faulty element.
- Tip: In the 2D area, 2D circles or 2D ellipses with an infinitely small size, but also hidden (faulty) room labels are often the cause of display problems. In the 3D area, the cause is often a 3D object in “infinity” or an elevation point in the terrain.
2. Solution Options
Option 1: Delete all elements of the category within the active layer
- By now, the floor, the layer, and the category of the faulty element are known.
- Activate the layer in the floor with the faulty element (the layer will then be displayed in red).
- In the menu, click on
Edit→Delete wizardand select only the category in which the faulty element is located. - Click on
Next→ selectin the active layer→Finish.

Option 2: Move the faulty elements
- Assumption for the following steps: The faulty element is located on the 1st floor on the “Extension” layer and belongs to the “3D Constructions” category.
- Activate the newly created 2D view mentioned at the very beginning (Right-click on the newly created 2D view →
Set as current element). This is a 2D view where all floors and layers are activated. - Create a new layer within the “1st floor” (according to the assumption, the floor with the faulty element – Right-click on the floor →
New layer). - Name the newly created layer, for example, “Scrap layer” (referred to as “Scrap layer” below).
- Activate the “Extension” layer (according to the assumption, the layer in the floor with the faulty element – the layer will then be displayed in red).
- In the menu, click on
Edit→Select wizardand select only the category to which the faulty element belongs (according to the assumption, e.g.,3D Objects→3D Constructions). - Click on
Next→in the active layer→Finish. - All elements of the category are now selected.
- Right-click →
Move to ...and select the newly created “Scrap layer” mentioned above. - In the next step, deactivate the “Scrap layer” (by removing the checkmark in front of it) and press
Home. - Now the floor plan should be visible again in the active 2D view.
- Reactivate the “Scrap layer” and set it as the active layer (Right-click on the layer →
Set as current element– “Scrap layer” will then be displayed in red). - Select all VISIBLE elements on the “Scrap layer” and move them back to the original layer (according to the assumption, to the “Extension” layer).
- Finally, you can delete the “Scrap layer” (Right-click on the “Scrap layer” →
Delete), as it now only contains invisible elements (because they are in infinity).
