


Are you looking to correctly set up the floor heights in your architectural design? In this comprehensive tutorial, we will show you exactly how to define and edit floor properties in cadvilla for both new and existing projects. Furthermore, you will learn how to adjust crucial parameters such as the rough height, clear height, and floor levels. As a result, you can ensure your 3D models and section views are perfectly accurate from the ground up.
Here is a summarized breakdown of the basic workflow:
1. Defining Floor Properties in New Projects
[00:19] Select the Ground Floor and Open Properties
- First of all, start your workflow in the
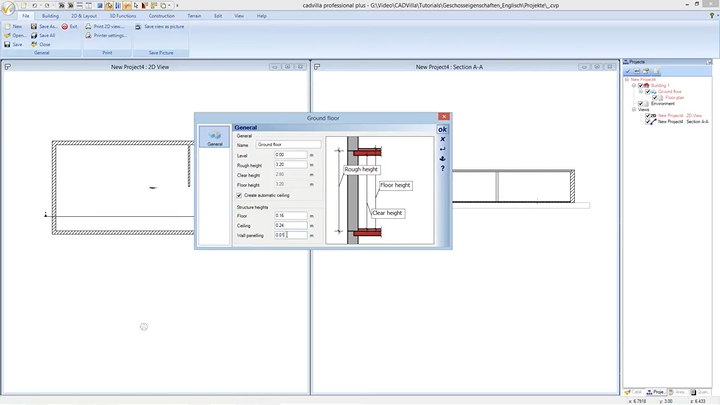
Projectspanel (located in the right window area) and select theGround floorlayer. Right-clickon the layer and choosePropertiesfrom the context menu. Consequently, theGeneral - Ground floordialog box will open.
[00:50] Defining Parameters: Level
- Within this dialog, use the
Levelparameter to set the relative height of the lower edge of the corresponding floor. - Typical values are
0.00m for the ground floor,-2.80m for the basement (cellar), and2.80m for the first upper floor. - Important: Always ensure you enter a relative height here. Therefore, do not use an absolute height based on the sea level across your project.
[01:22] Defining Parameters: Rough Height and Clear Height
- The
Rough height(default:2.80m) is measured by the program from the top edge of the raw ceiling down to the lower edge of the active floor. - On the other hand, the software automatically calculates the
Clear height. In essence, this automatically updating value results from the measurement from the upper edge of the finished floor up to the lower edge of the ceiling. - Calculation Example: A
Rough heightof2.80m minusFloor(0.08m) minusCeiling(0.16m) results in a totalClear heightof2.56m. - Accordingly, if you alter the values for the
Floor(e.g., to0.10m) and theCeiling(e.g., to0.20m), the program instantly updates theClear height(in this case, adjusting it to2.50m).
[02:43] Wall Paneling and Confirmation
- The
Wall panelingparameter heavily influences the area calculation (living space) inside your project evaluation. Usually, it corresponds to the thickness of a skirting board and is assumed to be 1 cm by default. Because a skirting board slightly reduces the usable floor space along the walls, this value directly changes the net living space during area calculations. However, for visual 3D planning purposes, this value has no visible effects. - Furthermore, you can subsequently adjust this value individually per wall side inside the specific wall properties.
- Finally, click
OKto securely save your new settings.
2. Changing Floor Properties in Existing Projects
Note: For this specific section of the video, a 2D view and a Section view have already been created side by side. Please note that section views are not included in the cadvilla basic version.
[03:45] Select the Floor and Adjust Parameters
- Just like before,
right-clickon the target floor layer (here:Ground floor) inside theProjectspanel and open theProperties. - Modify the
Rough height, for instance, up to3.20m. - Next, input a value of
0.16m for theFloorstructure. - Then, set the desired value for the
Ceilingto0.24m. - Once you are completely finished, click
OKto confirm and save the modifications.
[04:33] Verifying the Changes in the Section View
- Switch your active window focus to the created
Section view. Press the shortcutDto quickly activate theDistancefunction. - Measure the exact distance from the top edge of the upper ceiling to the lower edge of the floor. By doing this, you can accurately verify the new rough height (here:
3.20m). Afterwards, pressESC. - Subsequently, measure the thickness of the ceiling layer in order to physically verify the value of your defined ceiling (here:
0.24m).
[05:21] Effects on Existing and New Rooms
- If a floor plan already exists on the selected floor level, the program primarily adjusts the overall structural rough height and the ceiling according to your new values.
- Nevertheless, the height of the finished floor inside already drawn rooms remains completely unchanged. The reason behind this logic is that you might have already adjusted the floor manually in these individual rooms; therefore, the program intelligently protects these custom settings from being overwritten.
- Adopting the New Floor Height: Luckily, the software will automatically apply the newly defined floor properties as soon as you draw or configure a brand-new room.
- In the video, this specific behavior is demonstrated starting at [05:54]: By pressing the shortcut
V(extend/shorten wall), an interior wall is extended and completely separates off a new room area (Room 2). Looking closely at the section view, you can now clearly see the physical height difference between the structural floor of the old room and the newly created room.
Info: For further details regarding changing the floor height manually inside individual rooms, we highly recommend checking out our dedicated video tutorial on “Room Labeling“.