

Are you ready to bring your floor plans to life with detailed interior design? In this step-by-step tutorial, you will learn how to easily furnish a room using pre-defined 2D interior objects from the cadvilla catalog. First, we will show you how to correctly place, rotate, and align objects like beds and cupboards using reference points. Furthermore, we will demonstrate how to adjust the dimensions of existing items to fit your exact space. Finally, you will learn how to draw, customize, and save your very own 2D symbols for future projects.
Please note: The zoom functions demonstrated in the video are only valid up to version 5. In newer versions, you can zoom simply by scrolling the mouse wheel. For further details, please refer to our post on zooming in the 2D and 3D view.
Here is a summarized breakdown of the basic workflow:
1. Preparation and Inserting 2D Objects from the Catalog
[00:36] Prepare the Workspace
- In the first step, deactivate the grid and the line width to get a better overview of your floor plan. To do this, click on the
GridandLine widthoptions in the top menu bar.

- Press the shortcut
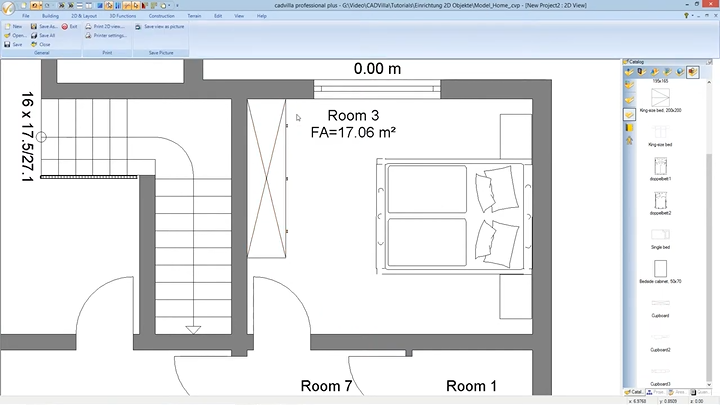
Pos 1orHometo quickly trigger theShow allfunction, centering your entire project on the screen. - Zoom specifically into the room you want to furnish by using the
mouse wheel(in the video: Room 3).
[01:34] Select and Place Objects from the Catalog
- Open the catalog overview by clicking on the
Catalogtab on the right side. Navigate to the2D Symbolssection where you will find a large selection of predefined objects. - Open your desired folder (e.g., “Bedroom”).
- Select an object (e.g., “King size bed”), press and hold the left mouse button, and easily drag it into your 2D view.
[03:07] Turn Objects and Change the Reference Point
- Move your cursor to reposition the object across the room.
- To change the angle of the object, simply scroll the
mouse wheel. Alternatively, you can enter the exact angle in theTool optionswindow. Note: If this window is hiding your view, press the shortcutWto hide or show the Tool Options Window. - To change the reference point of the 2D object (the exact anchor point where it attaches to your cursor), press the key combination
CTRL + W. Toggle through until your desired point is active, and then place the object with a left mouse click. Press theESCkey afterwards.
2. Moving Objects and Labels
[04:41] Moving Room Descriptions
- If the room labeling is in your way, select the text with a left mouse click.
- Press the shortcut
Rto activate the functionMove with reference point. - Click on a reference point (e.g., the top-left corner of the text frame) and simply move the description to your preferred spot. Press
ESC.
[06:35] Center Multiple Objects on a Wall
- Draw a selection box while holding down the left mouse button over all the objects you want to move (e.g., the bed and two bedside cabinets).
- Press the shortcut
Rfor the functionMove with reference point. - Now, select the central point of the bed as your temporary reference point. Right-click, select
Constructional support, and then chooseCenter point(shortcutM). - Click on the start point and the end point of the wall section where you want everything centered. The objects will instantly snap perfectly into the middle between those two points.
3. Changing the Dimensions of a 2D Object
[09:14] Adjusting Dimensions
- If an inserted object (e.g., a cupboard) is too large, select it and perform a double left-click to open the
2D symbolsettings (alternatively:right-click>Properties). - If you want to change the width and height independently, make sure to uncheck the
Maintain aspect ratiooption under theDimensionssection. - Enter your new values (e.g.,
2.50m for the width) and confirm your changes by clickingOK.
4. Creating Your Own 2D Symbols
[11:42] Using Guidelines for Construction
- Zoom into an empty room (e.g., Room 6). We recommend constructing your own objects using a precise grid of guidelines.
- Select
2D Layout>2D Guidelines>Guideline>Numeric parallel guideline(or simply press the shortcutP). - Tip: Change the color of your guidelines to stand out (e.g., Green) by right-clicking the line and selecting
Properties>Appearance>Color. - Enter your guidelines from existing walls adjusting for the exact distances you need (e.g.,
0.6meters,1.10meters, etc.).
[13:15] Drawing Shapes and Adjusting the Fill Style
- Draw the basic shape of your new furniture by navigating to
2D Layout>Rectangle>Rectangle, snapping it to the intersections of your guidelines. - To adapt the filling, select the constructed rectangle, press the
right mouse button, and click onProperties>Filling. - For the
Fill style, choose an option likeNoneorMonochrome, select a color (e.g., Silver), and hitOK.
[15:25] Adding Details with Lines
- To finalize your object, draw smaller details (like cabinet door demarcations) using the function
Line>Between two pointslocated under the2D Layoutmenu. Add things like handles by drawing smaller rectangles and transferring proper fill colors.
[20:09] Deleting Guidelines
- Before you save your new 2D symbol, you must delete all construction guidelines. Navigate to the top menu, select
Edit, and choose theDeleting Wizard. - In the wizard, first click
None. Then open theHelp elementsfolder, check the box forGuideline 2D, clickNext, and finish the process by clickingFinish.
5. Saving and Importing Your Custom 2D Symbol
[21:10] Save the Symbol
- Draw a large selection box over all elements of your newly drawn object so everything is highlighted.
- Press the
right mouse buttonand selectSave selected objects as 2D Symbol. - Choose a destination folder (e.g.,
My samplesunder theGraphics2Dstructure). Type in a descriptive name (e.g., “Cupboard_Example”) and pressOK. Note: The default directory depends on your operating system (e.g. C:\Users\User\Documents…)
[22:27] Import the Symbol
- To reuse your own symbol later, simply go to your Catalog and click on the
Open fileicon. - Find your saved symbol, double-click it, and easily insert the object into your current project as you would with any predefined item.