

To create high-quality renderings (raytraced images), the correct settings for materials, light, and shadow are crucial. Below you will find proven parameter settings that were used for our example image.

1. Material settings: Window glass
To make window surfaces look realistic and show slight reflections, the material properties of the glass panes should be adjusted.
- Set the 3D view as the active view.
- Call up the function:
3D Functions>Edit material> Click on the glass pane. - Settings:
- Intensity: 30 %
- Highlight size: 30 %
- Optimum reflection: Activated (check the box)
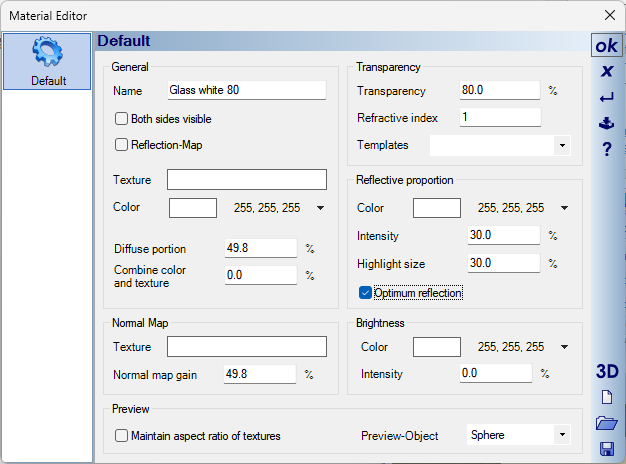
- Tip: After adjusting the settings, use the
Transfer materialfunction to quickly apply these properties to all other windows in the project.
2. Raytracing settings (Light & Shadow)
These parameters control the quality of the shadow calculation during the final rendering process.
- Set the 3D view as the active view.
- Call up the function:
3D Functions>Raytrace(Right-click on the icon). - Recommended values:
- Anti-aliasing: Strong anti-aliasing (for smooth edges without jagged lines).
- Ambient occlusion: Activated (provides realistic depth in corners and niches).
- Intensity: 105 % (Higher values lighten the shadows, lower values make them darker).
- Quality: 30 % (Higher values reduce “noise” in the shadow but increase calculation time).
- Max. area of influence: 10000 m.
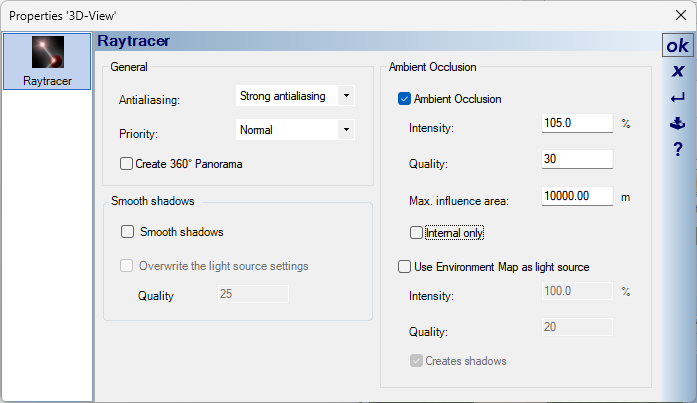
- Note: Activating “Ambient shadows” significantly improves image quality (e.g., under roof overhangs or balconies), but noticeably increases the calculation time.
3. Internal light sources & Environment light
The lighting of the scene is controlled via the internal light sources. The optimal values depend on whether you have activated “Ambient shadows” (see above) or not.
- Set the 3D view as the active view.
- Call up the function:
3D Functions>Internal light sources(Right-click on the icon).
Scenario A: WITHOUT ambient shadows
- Light intensity sun: 65 % (Color: White)
- Light intensity environment light: 30 % (Color: White)
Scenario B: WITH ambient shadows (Recommended) Since ambient shadows darken the image in corners, the basic brightness must be increased.
- Light intensity sun: 50 % (Color: White)
- Light intensity environment light: 50 % (Color: White)

4. Sun position and season
For a three-dimensional representation with interesting cast shadows, the sun’s position is crucial.
- Season: April (or September).
- Reason: In winter, the sun is too low (frontal, flat lighting); in summer, it is too high (hardly visible shadows under roof overhangs). Spring/Autumn often offers the best middle ground.
- Time: approx. 16:00 (4:00 PM).
- Orientation: In the example, the north arrow was rotated to 325 degrees so that the sun comes from the west and illuminates the facade well.