

Are you experiencing display issues or irregularities when using cadvilla in combination with an NVIDIA graphics card? Often, the cause is an outdated graphics driver or suboptimal settings in the NVIDIA Control Panel. By making specific adjustments, you can significantly improve the performance and stability of the software. In this tutorial, we will show you step by step how to configure the recommended settings for your NVIDIA graphics card. This ensures that cadvilla runs smoothly and efficiently on your system.
General Information & Preparation
- Tip: Before opening the NVIDIA Control Panel, briefly start cadvilla and close it right away. This ensures that the program appears in your recently used apps, making it easier to find in the next step.
- Important: If you cannot open the NVIDIA Control Panel even though your computer has an NVIDIA graphics card, please install the latest driver for your NVIDIA graphics card first.
- Important: If you have the GeForce Experience program installed, we highly recommend uninstalling it. Experience has shown that this additional software can cause runtime issues in combination with cadvilla.
1. Open the NVIDIA Control Panel
- Click on the NVIDIA icon in the taskbar at the bottom right of your desktop to open the Control Panel.

- Note regarding the new NVIDIA APP: If you have already installed the latest NVIDIA APP (the new user interface), you need an intermediate step: Click on
System>My Rig>Opento access the classic NVIDIA Control Panel.

2. Add cadvilla as a program
- In the NVIDIA Control Panel, click on
Manage 3D settingsin the menu on the left side.

- Switch to the
Program Settingstab on the right side. - Under 1. Select a program to customize, click the
Addbutton.

- A new window will open with a list of recently used programs. Find and select the entry
CAD Application 64 BIT(or similar, depending on your installed version). - Confirm your selection by clicking on
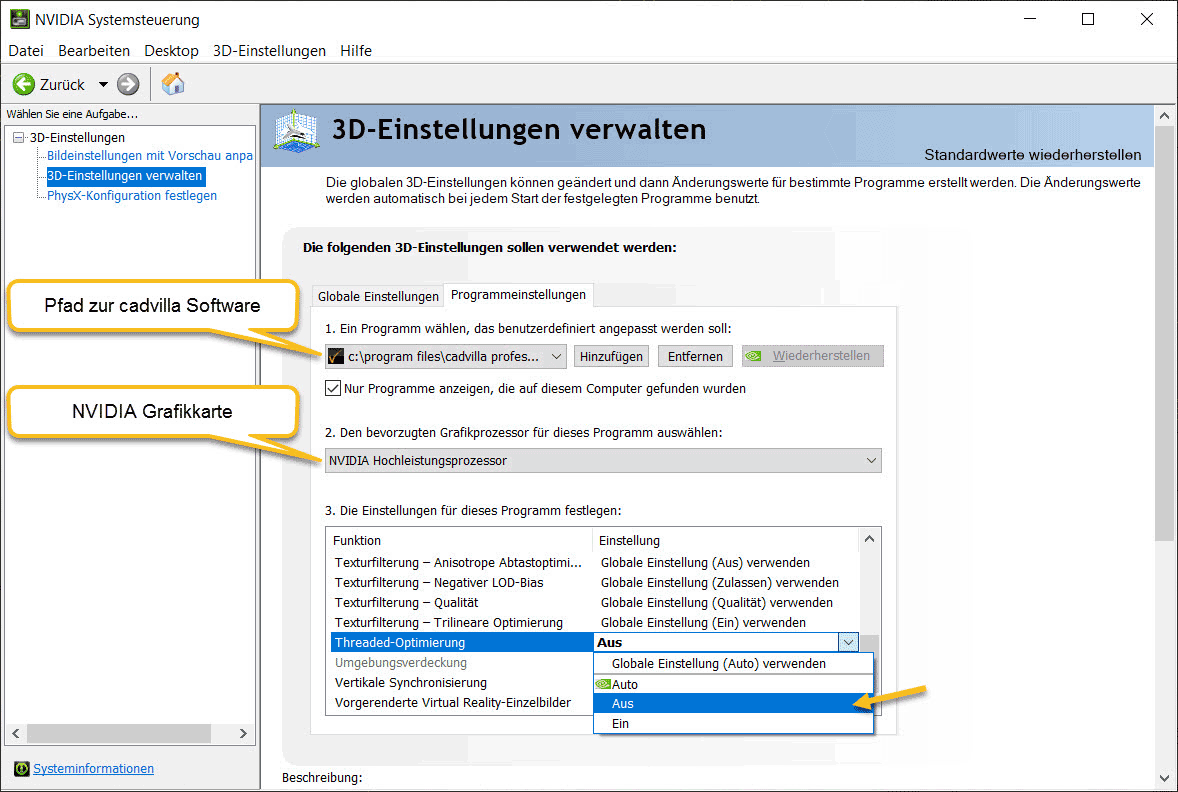
Add Selected Program. - Note: In the settings window, you will now see the file path to the cadvilla software at the top (for a standard installation of cadvilla professional plus 13, this is for example
c:\program files\cadvilla professional plus 13\program\cad.exe).
3. Adjust graphics processor and Threaded optimization
- Now go to 2. Select the preferred graphics processor for this program (this option is visible depending on your system configuration, e.g., on laptops).
- Open the drop-down menu and make sure to select the
High-performance NVIDIA processorso that cadvilla does not access a weaker internal graphics unit. - Next, scroll down the list under 3. Specify the settings for this program until you find the entry
Threaded optimization. - Click on the value next to it and strictly set it to
Off.
- Leave all other functions in this list at their default settings.
- Click on
Applyat the bottom right to save your changes.
Note: If you have also installed the GeForce Experience Center, you should uninstall it to avoid runtime problems with cadvilla.