


Are you looking to adapt a pre-designed garage from the catalog to match your existing house? In this step-by-step tutorial, you will learn how to insert, separate, and fully modify a garage group in cadvilla. We show you how to easily extend walls, adjust doors and windows, and change a pitched roof into a flat roof. Finally, you will see how to transfer the textures from your main house to the new garage for a perfect visual match.
Important note in advance: The function for inserting and separating groups is only available from cadvilla version 9 onwards.
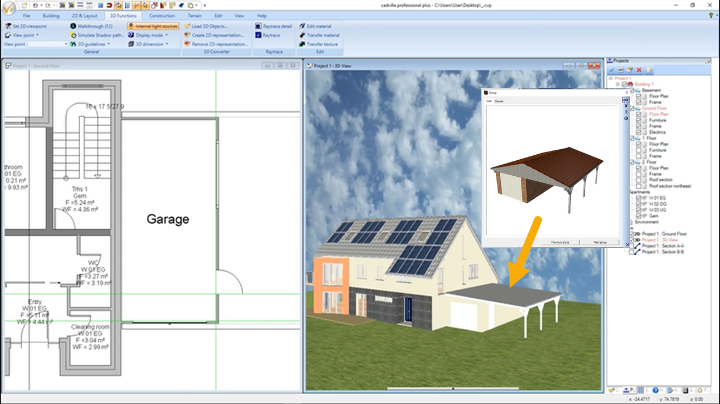
1. Define the position of the garage with guidelines
[01:12] Set guidelines
- Deactivate the grid and the line width to be able to catch and orient yourself better.

- In order to position the garage exactly later, we first set guidelines.
- Navigate to
2D & Layout>2D Guidelines>Guidelineand selectNumeric parallel guideline(or use the shortcutP). - Click on the reference line (an existing vertical line) and enter the approximate position of the guideline. In the dialog window that appears, enter the desired distance (e.g.,
3.50 m) and pressEnter. Repeat this for a horizontal line (e.g.,2.00 m). - Press
Escapeto end the function.
2. Insert and place the garage from the catalog
[02:07] Select garage
- Open the
Catalogon the right side. - Navigate to
Groups>Exterior>Garages>Misc. - Select, for example,
Garage and Carport 4with a double-click to open the preview. Confirm withOK.
[03:04] Place the garage in the project
- Click again on the garage in the catalog and drag it into the 2D view.
- Place the garage roughly near the guidelines, make a mouse click and press
Escapeafterwards.
[03:34] Move the garage exactly
- Select the garage in the 2D view.
- Select
Move with reference pointin the upper menu (or use the shortcutR). - Click on the lower right corner of the garage in the 2D view as a reference point and place it exactly on the intersection of your guidelines. Press
Escape.
3. Separate group and adjust walls
[04:35] Separate group
- Select the garage with a left-click.
- Right-click to open the context menu and select
Separate group. The garage now consists of individual, editable elements.
[04:52] Delete wall and extend adjacent walls
- Select the left wall of the garage (which borders the house) and press the
Deletekey to remove it. - To connect the remaining garage walls to the house, press the shortcut
Vfor theextend / shorten wallfunction. - Click on the end of the lower garage wall and then on the house wall. Repeat this for the upper garage wall. Press
Escape.
Tip: [05:32] To adjust the room labeling, double-click on the “Room 3” text in the 2D view and change the name in the properties field to “Garage”.
4. Modify garage door, doors, and windows
[06:07] Adjust and center the garage door
- Select the garage door in the 2D view, right-click, and select
Properties. - In the
Doorproperties window, change theWidth(e.g., to2.70 m), press theTabkey, and confirm withOK. - To center the door, select it again and choose
Move. - Right-click, select
Constructional support>Centre point(or shortcutM). Click the two wall points between which the garage door should be placed centrally.
[07:51] Move door and change properties
- Set a new guideline (e.g.,
1.00 mdistance to the inner wall) using the shortcutP. - Select the door, press
R(Move with reference point), choose a corner of the door, and place it on the guideline. - Double-click on the door to adjust the
Height(e.g., to2.10 m). - By right-clicking on the door, you can also select
Change opening hinge.
[09:18] Change window dimensions
- Select the window, right-click, and select
Properties. - Adjust
Width(e.g.,2.50 m),Height(e.g.,0.60 m), andSill height(e.g.,1.50 m), pressingTabafter each, and confirm withOK.
5. Change roof shape and transfer textures
[10:10] Convert pitched roof to flat roof
- Select the roof in the 2D view, right-click, and select
Properties. - In the dialog window that opens, click the
3Dbutton to open the preview. - In the 3D preview, select
Roof side 2and change thePitchto3.00 %. - Select
Roof side 4, set theProfiletoGable, and theOverhangto0.00 m. Confirm withOK.
[11:20] Remove unneeded elements
- In the 3D view, delete the protruding wooden claddings by selecting them and pressing the
Deletekey.
[11:32] Correct wall heights of the garage to the floor height of the house
- In the 2D view, select the first garage wall adjacent to the house, right-click, and select
Properties. - Check the
Automaticbox under Height and confirm withOK. - Repeat this for the second adjacent garage wall. (Alternatively, double-click the wall to open properties).
[12:45] Transfer textures from the house to the garage
- Navigate to
3D Functionsand selectTransfer material. - Click on the yellow wall of the main house (source) in the 3D view.
- Hold down the
Shiftkey and click on the walls of the garage (target) to apply the texture. - Repeat this process to transfer the roof texture of the house to the garage roof.