

Do you want to create a clean and professional side view in cadvilla for presentation or construction planning? In this tutorial, you will learn how to generate a side view, add precise dimensions, insert labels, and apply textures step by step. In addition, you will see how to improve the visual quality of the elevation by hiding unwanted lines and using 2D graphic elements. As a result, you can create a clear and well-structured side view for your planning documents.
Creating a side view works similarly to creating a section view. However, the section axis is positioned outside the floor plan, while the section depth includes the entire building. Therefore, always pay attention to the North Star, because it determines the correct orientation of the side view.
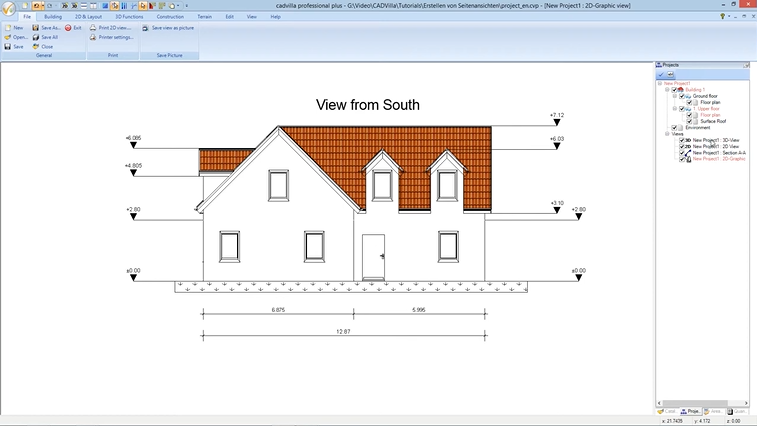
Please note: Side views are available in cadvilla Basic Plus, Professional, and Professional Plus. The zoom functions demonstrated in the video are only valid up to version 5. In newer versions, you can zoom simply by scrolling the mouse wheel. For further details, please refer to our post on zooming in the 2D and 3D view.
1. Create and Clean Up the Side View
[01:25] Open the Section View
- Select
View>New Section View. - Click two points to define the section axis. Hold down the
CTRL Keyfor exact alignment. - Then click a third point to define the
Depth of the Section-View. - The side view opens automatically.
[02:37] Remove Hidden Lines
- Press
ESC-Keyif necessary. - Right-click in the view and select
Properties. - Activate
Hidden line removalin2D-View - General. - Confirm with
OK.
2. Add Dimensions
[03:28] Insert Guidelines
- First, deactivate
View>GridandView>Line-width on/off.

- Then select
2D-Layout>2D-guidelines>Guideline>Numeric parallel guideline. - Enter the distance and confirm with
OK. - Place the guidelines accordingly.
[06:07] Insert Height Dimensions
- Select
2D-Layout>Dimensions>Height dimension (raw construction). - Add the height dimensions and align them with the guidelines.
[08:49] Insert Single Dimensions
- Select
2D-Layout>Dimensions>Single dimension. - Insert the required dimensions and position them properly.
- Press
ESC-Keyto finish.
3. Add Text
[09:35] Insert a Label
- Select
2D-Layout>Text>Labeling. - Define the placement area.
- In
Properties Text, activateLink to scale. - Enter a value such as
0.6for the size. - Insert your text (e.g.,
View from South) and confirm withOK. - Move the text if needed using the
Movefunction.
4. Texture Roofs and Surfaces
[11:16] Create a single 3D Surface on the roof
- Right-click the floor with the roof (e.g.,
Upper Floor) and selectNew layer. - Name it (e.g.,
Surface Roof) and confirm withOK. - Switch to 3D view and activate the new layer via
Set current element (CTRL + left mouseclick). - Select
Construction>Single 3D Surface>Insert in plane. - Click the roof surface.
- Enter
0.001forThicknessand confirm withOK.
[13:08] Assign a Texture in the side view
- Select the surface in the side view.
- Right-click →
Properties. - Go to
Tiles(Material) >2D-Display. - Set
Fill styletoTextureand choose a texture viaPath. - Adjust size if necessary and confirm with
OK.
5. Texture via 2D Polygon
[15:29] Draw and Fill a Polygon
- Select
2D-Layout>Polygon>Closed Polygon. - Draw the shape.
- Right-click →
Complete. - Then
Properties→Filling. - Choose a fill style (e.g.,
2D-Fill pattern) and confirm.
6. Hide the Storey Dividing Line
[19:00] Cover with White Line
- Select
2D-Layout>Line>Line between two points. - Open
Propertiesand setColortoWhite. - Draw over the dividing line.
- Confirm with
OK. - Optional: Select the new line and choose in the
Selection menu>Bring to front.
7. Create a 2D Graphics View (Optional)
[20:16] Create Independent View
- Select
View>New 2D-Graphics view. - This view is not linked to the model anymore.
- Therefore, changes are not synchronized.
- Use this only at the end of your project.
Final Tip
To achieve the best results, follow a structured workflow. First, create and clean the side view. Then, add dimensions and labels. Afterwards, apply textures and visual improvements. Finally, create a 2D graphics view only when your project is completed.