

Do you want to perfectly integrate your 3D house model into a real-world environment? In this tutorial, we will show you exactly how to create a photorealistic 3D visualization with the help of a background picture using cadvilla. First, we cover the essential project preparations, such as adjusting the terrain and hiding auxiliary elements. Furthermore, you will learn the rules for choosing the right photo, how to properly position your model, and how to fine-tune lighting and materials. As a result, you will be able to render a stunning, high-quality image of your architectural project.
Please note: The zoom functions demonstrated in the video are only valid up to version 5. In newer versions, you can zoom simply by scrolling the mouse wheel. For further details, please refer to our post on zooming in the 2D and 3D view.
Below is a detailed overview of the video’s content.
1. Preparations in the Project
[01:16] Adjust the Terrain Thickness
- First of all, hold down the
CTRLkey and left-click theEnvironmentlayer in the right-handProjectspanel to select it. - Next, select the 3D terrain with the left mouse button directly in the 3D view.
- Perform a right-click and select
Propertiesfrom the context menu. - In the new window, uncheck the option
Disable automatic thickness. - Enter your desired value in the
Thicknessfield (for example,0.01m) to make the terrain appear as a thin sheet, and confirm by clickingOK. - Finally, press the
ESCkey to cancel the selection.
[02:31] Hide Auxiliary Elements
- To prepare a clean view, right-click on an empty space in the 3D view and select
Visibility. - Scroll down to the
Visible categoriessection. - Uncheck the boxes for
Origin/North arrowto hide these helper lines, and close the dialog by clickingOK.
2. Insert Background Picture and Position Project
[03:16] Select a Background Picture
- Right-click the empty background of the 3D view and choose
Properties. - In the
Properties 3D-Viewdialog, navigate to theAppearancetab on the left. - Under the
Backgroundoptions, activate theBackground pictureradio button. - Click on the
Imagefilefield. - Browse your computer to find your desired background photo (e.g., bg003.jpg), select it, click
Open, and confirm the properties window withOK.
[04:24] General Information About Background Pictures
- Resolution: Never use background pictures with a resolution higher than the one you plan to use for rendering your final project. Pictures with excessively high resolutions will consume unnecessary RAM and may cause software issues.
- Focal Length: When you take a background picture, you must use a focal length of at least 50mm (35mm equivalent). If you shoot with a wide-angle lens (e.g., 16mm), you will likely get converging lines that distort the perspective.
- Camera Position: For a standard frontal view of your modeled house, place your camera on a tripod at a height of approximately 80 cm. This is generally the best position for realistic results.
[06:04] Position the Project in the Picture
- You can position the project visually by matching the perspective. Simply rotate, tilt, and zoom the model using your mouse until the perspective perfectly aligns with the background picture.
- Note: For a cleaner alignment process, it is sometimes helpful to temporarily turn off the visibility of certain layers (like the basement or environment) in the
Projectspanel. Read the on-screen prompts for keyboard shortcuts (like SHIFT + Mousewheel) to navigate the 3D view seamlessly.
3. Optical Fine-Tuning
[08:25] Adjust the Environment Material
- Navigate to the top menu, select
3D functions, and click on theEdit material. - Click directly on the green grass area of the terrain in your 3D view to open the
Material Editor. - To adjust the look, you can modify the
Diffuse portion(e.g., to0.9) or choose a different texture by selecting the texture path. Confirm your changes by clickingOK.
[09:43] Insert 2D Objects for Decoration
- To add realism, open the
Catalogpanel on the right side of the screen, expand the2Dfolder, and selectPlants. - Press and hold the left mouse button to drag a 2D plant object (e.g., Tree01) directly into your 3D view.
- Tip: While placing the object, you can scroll the mouse wheel to turn (rotate) the 2D object exactly how you want it. Hit
ESCwhen finished.
4. Lighting and Raytracing (Rendering)
[11:22] Define Light Sources
- Go to the
3D functionsmenu and right click on theSun position. - In the properties dialog, ensure the
Calculate sun positioncheckbox is active. Here you can set a specific location, date, and time. - Under
Environment light sources, check the color (Whitebalanceto White) and adapt theLight intensityto suit your scene (e.g.,70). Confirm everything withOK.
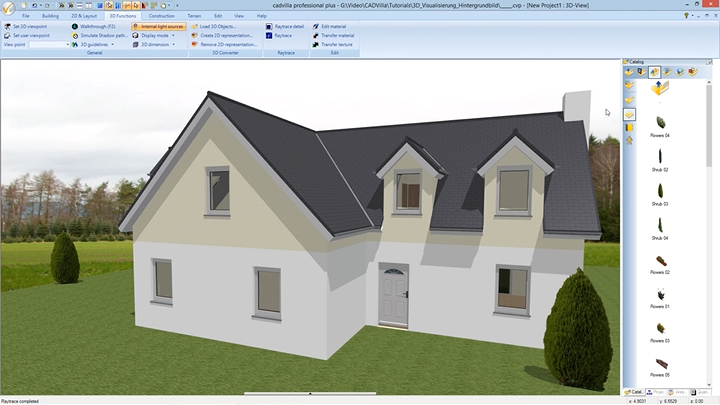
[12:16] Raytrace (Render) the Project
- Finally, navigate to
3D functionsand click theRaytracebutton. - The
Properties 3D-Viewdialog will open on theRaytracertab. - To ensure smooth edges, go to the
Antialiasingsection and selectStrong Antialiasingfrom the dropdown menu. Ensure options likeSmooth shadowsandCreate shadowsare checked where appropriate. - Click
OK. The software will instantly start calculating and will present your finished, photorealistic image shortly after.
For detailed instructions on how to save the final rendered image to your computer, please refer to our related article on printing and saving 3D views.