Do you want to model complex 3D shapes such as gutters, moldings, handrails, or special pipes in cadvilla? For such specific components, which feature a constant cross-section along a defined path, the “Sweep solid” tool is fundamentally the perfect choice. A sweep solid basically always consists of two essential elements: a profile (the cross-section) and a polyline (the path). While cadvilla already includes several standard profiles, you occasionally reach technical limits during highly individual planning. Therefore, in this tutorial, we will show you how to easily create, permanently save, and actively apply custom profiles for sweep solids – clearly explained using a roof gutter as a practical example.
In this context, the specific cross-section of the gutter (e.g., a semicircle with defined edges) represents the profile, and the continuous edge of the roof where the gutter should technically run along represents the polyline.
This is exactly how you create and apply your own custom profile:
1. Draw the profile as a 2D polygon
In the very first step, you accurately draw the desired cross-section strictly as a closed 2D shape.
- Initially, switch directly to a 2D view.
- In the upper application menu, go to
2D & Layout>Polygon>Closed polygon. - Now, carefully draw the geometric cross-section of your desired object (e.g., the physical shape of the gutter). Make absolutely sure that the drawn polygon is completely closed at the end.

2. Save the drawn profile in the catalog
Subsequently, to use the drawn polygon actively as a profile for a sweep solid, you must necessarily save it to the internal cadvilla library. →
- Select the recently drawn, closed polygon using a simple left mouse click.
- Afterwards, click with the right mouse button directly on the marked polygon.
- In the appearing context menu, deliberately select the command
Save selected objects as profile... - Consequently, a save dialog opens. As the primary storage location, ideally choose the specific folder path
Catalog>AEC>Profilewithin your existing catalog directory. - Assign a unique and clear file name (e.g., “Gutter”) and safely save the file.
- Furthermore, in case of technical problems regarding write permissions, please explicitly refer to our support article on the Windows User Account Control.

3. Use the custom profile for a sweep solid
Finally, you can technically retrieve your newly created profile directly when entering a new sweep solid.
- Start the specific function for defining a sweep solid (e.g., systematically via
Construction>Sweep solid>Insert with polygon). - Select a surface in 3D to which the generated sweep solid should physically run strictly parallel.
- Inside the 2D view, actively click the right mouse button >
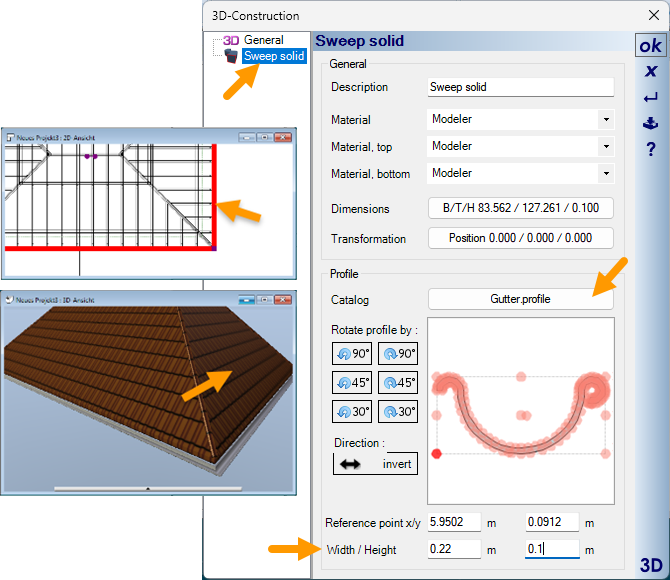
Properties, and thereby properly open the properties dialog specifically for sweep solids. - Click systematically on the
Sweep solidtab within the dialog and subsequently on the buttonCatalog>Select profile. - Navigate directly to the exact folder where you previously saved your profile (e.g.,
AEC>Profiles), and explicitly select your custom profile from the list. - Within the properties dialog, definitively set the exact
WidthandHeightof the profile if technically required. - Confirm your active settings by clicking
OKand now accurately draw the polyline (the path) for your intended sweep solid directly in the project. The final 3D object is now successfully generated exactly with your individual cross-section.