


Do you want to create a custom roof in your 3D house planning and tailor it exactly to your needs? In this video tutorial, we show you how to enter a roof and define its properties using the cadvilla software. Step by step, you will learn how to add a new floor, use the automatic contour detection, and apply various roof shapes like gable or hipped roofs. Additionally, we’ll explain how to quickly transfer properties to other roof sides and close gaps in the walls below, allowing you to construct the perfect roof in no time.
Please note: The zoom functions demonstrated in the video are only valid up to version 5. In newer versions, you can zoom simply by scrolling the mouse wheel. For further details, please refer to our post on zooming in the 2D and 3D view.
General information about entering a roof
- The roof polygon can be entered either playfully via a rectangle, a free polygonal shape, or via automatic contour detection.
- Once the contour is determined, you edit all roof sides individually in the roof dialog. You conveniently select the sides in the 3D preview or via the tree structure.
- Each roof side can have an individual height. Alternatively, you can also shift the entire roof in height with a single entry.
1. Create a new attic floor
[00:40] Create a new floor
- Deselect the grid and line width to be able to catch points and orient yourself better.

- Right-click on your project in the project window and select
New floor above. - Enter “Attic”, for example, as the name for the new floor under the
Generaltab.
[01:21] Select transfer settings
- Switch to the
Transfertab. Select the floor below as the source (e.g., “Upper floor”). - Under “Objects,” choose the option
Selected. - Check only the
Construction elements(walls) here. You can, of course, also transfer other objects if needed. - Switch back to the
Generaltab and confirm the entry withOK. The new floor is now created.
2. Insert roof shape
[02:36] Open roof construction
- In the upper menu, click on
Building, then go toRoof constructionand selectInsert roof. - Choose the option
Insert roof on selected contourfrom the submenu.
[03:14] Confirm floor plan
- Move the mouse pointer over the floor plan in the 2D view.
- The program automatically recognizes the outer contour and highlights the area green. Confirm this with a click of the
left mouse button. - Tip: If the basic shape of the roof is not recognized correctly, change the input method. In that case, choose the option
Insert roof on free contourfrom the dropdown menu.
3. The roof construction dialog
[03:33] Open dialog and 3D preview
- The
Roof constructiondialog opens. - Click the
3Dsymbol in the lower right corner to open a roof preview window.
[04:08] Adjust materials and cladding
- Under the
Materialstab, you change the textures for the roofing material, ridge, or gable-end elements. - In the
Claddingarea, you activate or deactivate elements like gutters, verge boards, ridges, or valley flashings and adjust their dimensions.
[05:22] Define wood construction
- Under
Wood constructionandWood dimensionsyou define the entire wooden structure (purlins, collar beams, rafters) and their measurements. - In the
Raftertab, you set the eaves cut (e.g., horizontal, right angle, vertical). - Under
Eaves detailsandGable and detailsyou customize cornice types, rafter ends, and the purlin visibility.

4. Define individual roof sides
[07:29] Select roof side and profile type Gable
- Select the desired roof side in the 3D preview window with the
left mouse button. The side is automatically selected in the register. - Now select a profile type, for example,
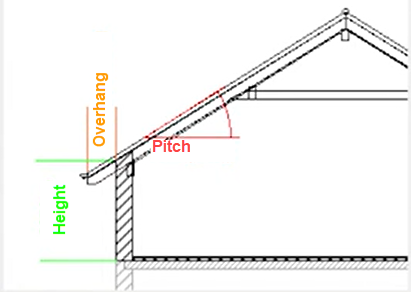
Gable. - Enter the desired value (e.g., 0.50 m) under
Overhang. - Press the
TABkey to confirm the entry and update the preview window.
[08:22] Profile type Hipped roof
- Select the next roof side (e.g., Roof side 2). Here, select the profile type
Hipped roof. - Enter the
Pitch(e.g., 32 degrees) and theHeight(e.g., 1.80 m) for the hipped roof. Confirm again with theTABkey.
5. Transfer properties with multiple copy
[09:30] Start multiple copy
- To transfer the settings of a finished roof side to other sides, use the
Multiple copyfunction. Click on the corresponding button. - The “Multiple copy” dialog opens. The currently defined (selected) roof side lights up red.
- Now select the roof sides that should adopt these properties. They will turn green.
- Click on
Transferand confirm withOK. - When all roof sides are completely defined, close the entire roof dialog by clicking
OK.
6. Close gaps in the gable wall (Adjust rough height)
[12:19] Open properties of the attic
- After creating the roof, you often still see a hole or gap in the gable wall in the 3D view.
- To close this, simply open the project window, right-click on the
Atticfloor, and chooseProperties.
[12:30] Change rough height
- Change the value for the
Rough heightto a sufficiently high value, for example, 6.00 meters. - Click on
OK. The program now automatically cuts off the projecting walls exactly at the roof edge. The hole is closed.
7. Control visibilities (Wood construction, Cladding)
[12:57] Show and hide cladding and timber construction
- To hide the roof cladding in the 2D and 3D views, click on the
Claddingsymbol at the top menu bar.

- To hide further elements, right-click in the view and select
Visibility. - In the dialog under “Finishing elements”, remove the checkmark for
Roof panellingand confirm withOK. - Now you only see the pure wooden structure. You can also fade this in or out using the
Timber constructionsymbol in the upper icon bar.
8. Move roof level by a defined value
[13:58] Move roof level
- Select the roof in the view, right-click, and choose
Properties. - In the
Generaltab, you will find the fieldMove roof level by. Enter the desired value here (e.g., -1.00 for one meter downwards). - Click on
Applyto check the change in the preview. - Finally, confirm with
OKto accept the new height. PressESCto deselect the roof