


Are you planning a staircase, a chimney, or a supply shaft in your current project? For all these architectural elements, you will inevitably need an opening in the floor ceiling. Fortunately, in cadvilla, you can insert such ceiling cutouts quickly and precisely. You have the choice between various shapes such as a rectangle, a circle, or a free polygon. Therefore, in this tutorial, we will show you how to enter a ceiling cutout correctly and what you absolutely need to consider regarding the ceiling type.
Note: In order to enter a ceiling cutout in cadvilla, you first need an existing ceiling in your project.
Call up the function and select the shape
- Click on the
Buildingtab in the upper ribbon menu. - Select
Cutout>Ceiling cutout. - Now you can choose the shape for your cutout. You have the option to draw the opening as a
rectangle, as acircle, or as afree polygon.
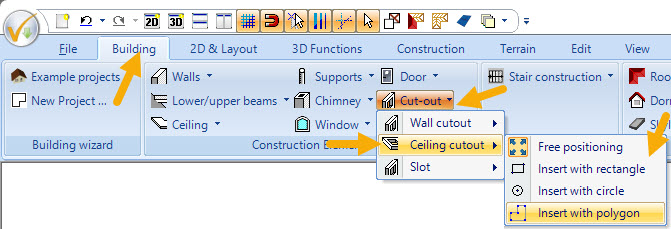
Input options for a ceiling
For the cutout to work properly, a ceiling must be present. In cadvilla, there are generally two ways how a ceiling is created:
- Use of the automatic ceiling: This ceiling is generated automatically by default when creating a new floor.
- Manual input of the ceiling: You can also draw a ceiling yourself. Therefore, click on
Building>Ceiling. - Note: Also specifically refer to our post on entering a ceiling.
Activate the automatic ceiling retroactively
If you have deactivated the automatic ceiling during the floor creation, you can essentially turn it back on at any time:
- Right-click on the desired floor in the project manager (usually found on the right side of the screen).
- Select
Propertiesfrom the context menu. - A dialog window opens. Here, you can easily activate or deactivate the checkmark for
Create automatic ceiling.
Important note to avoid errors: Make absolutely sure that in your project, an automatic ceiling AND a manually drawn ceiling do not lie exactly on top of each other. If you enter a ceiling cutout in such a problematic situation, the program randomly assigns the cutout to one of the two ceilings. Consequently, this often leads to completely undesirable results in the 3D representation.