


Are you looking to design a highly personalized balcony for your 3D house planning project? In this comprehensive video tutorial, we will show you exactly how to create a complete balcony using the architectural software cadvilla. First, you will learn step-by-step how to accurately construct base plates, pillars, and railings by utilizing sweep solids and 2D guidelines. Consequently, you can save the finished construction as a custom 3D object, allowing you to flexibly insert the tailored balcony into any of your future floor plans at any time.
Note: Some of the functions shown are exclusively included in the cadvilla professional and cadvilla professional plus versions. Furthermore, the zoom functions demonstrated in the video are only valid up to version 5. In newer versions, you can zoom simply by scrolling the mouse wheel. For further details, please refer to our post on zooming in the 2D and 3D view.
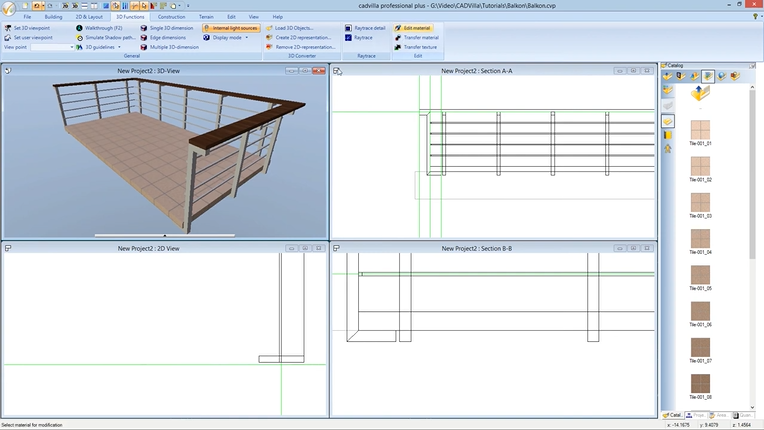
Below is a rough overview of the video’s content.
1. Create the Base Plate of the Balcony
[00:48] Set Guidelines
- First, open a new 2D view via
File>New>2D Viewand maximize the window. - Deactivate the
Grid on/offand theLine width on/offunder theViewmenu to be able to snap and orientate yourself better.
- In the first step, we create the base plate in the 2D view. Therefore, use guidelines.
- Select
2D & Layout>2D Guidelines>Guideline>Vertical guideline(andHorizontal guideline). Use theNumeric parallel guidelinefunction to accurately sketch the dimensions of your balcony.
[03:01] Create Single 3D Surface for the Base Plate
- Select
Construction>Single 3D Surface>Insert with rectangle. - Draw the rectangle precisely along your guidelines. Subsequently, the
single 3D surfacedialog opens. - Define the thickness of the base plate natively.
- Furthermore, go to
Tiles>2D Display. SelectNonefor theFill style. Confirm withOK. - Important: Ensure that you enter the base plate in the correct floor level (set the respective floor to active).
2. Create Section Views for Editing
[04:10] Define Section Views
- Now, create two section views for the base plate. Select
View>New section view. - Define the area for the first section (horizontal section axis). While doing this, hold down the
CTRLkey to lock it exactly horizontal. The section depth should cover the entire base plate. The section window opens. - Similarly, create a second section view (vertical section axis) using the same function.
[06:02] Arrange Views
- Open a new 3D view via
View>New views>New 3D-View. - Deselect the
Environmentin theProjectspane for the newly created 3D view. - Arrange all 4 views clearly side by side using the
View>Windows>Horizontalfunction.
[04:49] Important Information Regarding Section Views
- Tip: To keep the section views clear, you can right-click, select
Visibility, and deselect theOriginunder “2D graphic elements”.
3. Enter Main Supports (Pillars) of the Balcony
[07:02] Choose Sweep Solid for Pillars
- Select the first section view. Consequently, set exact guidelines for the dimensions and positioning of the pillar (e.g., using
Numeric parallel guidelineat -0.20m for the bottom). - Select
Construction>Sweep solid>Insert with polygon. - Left-click into the section view to specify the drawing plane.
[08:51] Define Properties for the Pillar Profile
- Click the right mouse button and select
Properties. - Ensure
Sweep solidis selected. Define theWidth(e.g., 0.06m), theHeight(e.g., 0.06m), and theReference point(e.g., the bottom-left corner) for the profile here. Confirm withOK. - Draw the sweep solid polygon sequentially in the section view. Afterwards, right-click and select
Complete with <Enter>.
[10:05] Change Material and Color of the Pillar
- Select the 3D view. Choose
3D Functions>Edit material. - Click in the 3D view on the newly created sweep solid pillar. The
Material Editoropens. - Here, you can right-click the texture to
Remove selection, adjust theColor(e.g., to Silver), and set theDiffuse portion. Confirm withOK.
[10:56] Move Pillar
- Mark the pillar to position it precisely in the 2D top view.
- Select
Move with reference pointfrom theSelectionmenu. The green guidelines will perfectly assist you in placing it accurately.
[12:18] Create Multiple Copies of the Pillar
- Select the pillar, right-click, and select
Multiple copy.... - Enter the number of
Copies, theDistance, and theDirection(e.g., 270°) in the Tool options. - Confirm with
OKto generate the pillars.
[13:15] Copy Pillars to the Opposite Side
- Select the pillars on the broad side via a selection box.
- Choose
Copy with reference pointfrom theSelectionmenu. - Set the reference point in the 2D top view and roughly position the copied pillars at the new location.
- Rotate the pillars 180 degrees using the
Selection>Rotate around Z-axisfunction. - Finally, utilize
Move with reference pointagain to position the pillars at their exact final location.
[14:48] Copy Pillars to the Front Side of the Balcony
- To copy, rotate (e.g., 270 degrees via
Rotate around Z-axis), and move the pillars for the front area, proceed similarly as described in the previous steps.
4. Create Railings and Handrail
[17:39] Enter Railings
- The creation of the horizontal railing bars works similarly to the pillars.
- Select
Construction>Sweep solid>Insert with polygon. - Left-click in 3D view on the top surface of the base plate to set the reference plane.
- Press the right mouse button and select
Properties. UnderSweep solid, define theWidth(e.g., 0.02m),Height(e.g., 0.02m), andReference pointfor the railing. - Draw the polygon for the railing path directly around the pillars. Complete the input with a right-click and
Complete with <Enter>. - To instantly color it properly, use the
3D Functions>Transfer materialtool to copy the silver material from a pillar directly onto the new railing. - If necessary, copy the baluster/railing post in the section view using the
Multiple Copyfunction.
[21:28] Enter Handrail
- Select the
Construction>Sweep solid>Insert with polygonfunction again. - Left-click the reference surface in the 3D view and open
Propertiesvia right-click to define the handrail dimensions (e.g., Width 0.04m, Height 0.02m). - Draw the sweep solid path.
- Use
3D Functions>Transfer materialagain to match the color to the pillars. - Tip: To add a nice floor texture, simply open the
Catalogue>Materials>Tiles, select a texture, and drag it directly onto the balcony floor in the 3D view.
5. Save Balcony and Insert into Project
[25:58] Save as 3D Object
- Ensure the 3D view is active.
- Open the menu and select
Export>3D Formats>3D object file.
- Assign a name (e.g., “Balcony”) in the “Save Object File as” dialog and confirm with
OK. - In the newly opened “Export Project” window, you can define further options. Click on
OK. Your balcony is now saved completely as an independent 3D object. - Note: The file name must NOT contain any umlauts (ö, ü, ä, …) or special characters! Please also refer to our information on user account control.
[26:52] Insert Balcony into Project
- To use the balcony in an existing model home project, select
Catalogue>Open object file(or directly via the side catalog window). - Select your saved balcony object file.
- Position it accurately on your project house natively. To achieve the best results, use
Edit>Selection>Move with reference pointalong with a section view to perfectly align the balcony’s floor level with your model home’s floor level.