

Are you looking to design the windows in your 3D house planning exactly to your specifications? In this video tutorial, we will show you how to individually customize predefined window constructions within the cadvilla software. Furthermore, you will learn step-by-step how to assign different materials for the interior and exterior, insert glazing bars, and set precise dimensions. As a result, you can optimally configure window sills and floor plan representations, enabling you to create tailor-made windows for your building project in no time.
1. Selection of a window construction
 [00:50] Call up window construction
- First, select
Building>Window>Window construction>Free positioningfrom the menu. - Next, right-click in the 2D view and select
Properties.
[01:09] Select window template
- In the dialog window, under the
Generaltab, you can choose from a variety of templates (e.g., Simple window, window curved, triangled window, window 2 sash, or floor-to-ceiling). - Double-click on the desired window template (in the video, for example,
Standard).
2. Specify materials for window frame and glass
 By default, there is one texture for the frame (white) and one for the glass. However, if you need different colors for the inside and outside, you simply create new materials.
[01:43] Create a new material
- Switch to the
Materialstab. - Click on
New material. Consequently, the currently selected texture is copied. Click on the new entry to edit it.
[01:51] Name and adjust the material
- The
Building materialsdialog window opens. - Assign a new designation under
Name, longandName, short(e.g.,Pine-WHITEorPine-DARK-GREY).
[02:12] Define 3D View and color
- Switch to the
3D Viewtab. - To use a pure solid color, right-click on the
Texturefield and selectRemove selection. - Afterwards, click on the
Colorfield and select the desired shade. - If necessary, adjust values such as the
Reflective proportion(Intensity) orHighlight size. Finally, confirm withOK.
3. Assign materials to the profiles
 [04:25] Edit profiles
- Switch to the
Profilestab. - Select the desired component under the
Profiledrop-down menu (e.g.,Frame profile,Casement profile, orMuntins profile). - Now, assign your previously created materials under
Material, innerandMaterial, outer. - Furthermore, you can also adjust the dimensions (e.g., Profile depth) of the respective profiles here.
4. Insert glazing bars (muntins)
 [05:25] Open the bars editor
- Left-click in the preview window to select it.
- Then, right-click inside the window’s preview pane.
- Select
Edit bars....
[05:44] Add a new bar
- Click on the plus symbol (
New bar...). - Choose between
New bar, horizontal...orNew bar, vertical.... - Set the position (e.g.,
50%) and confirm withOK. - Optional: In the same window, you can also change the dimensions of the bars under
Standard profile values. Finally, confirm withOK.
5. Define opening dimensions and other settings
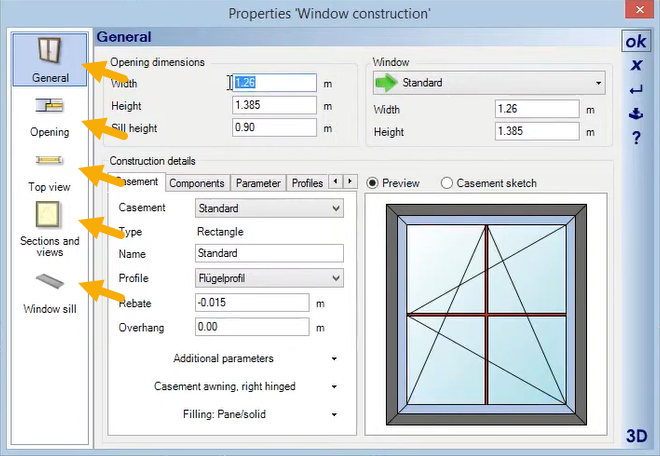 [06:11] Define opening dimensions
- Switch back to the
Generaltab. - Under
Opening & dimensions, define theWidth,Height, andSill heightof your window.
[06:36] Opening and stop
- In the
Openingtab, you can set the stop width and theDepthof the window in the wall.
[06:58] Top view and parapet height
- In the
Top viewtab, you define theDisplay typefor the floor plan (e.g.,StandardorWire frame). - Additionally, you can show or hide the
Parapet height texthere.
[07:17] Sections, window sill, and additional components
- Under
Sections and views, you define theLine type. - In the
Window silltab, you make all settings for theInner window sillandOuter window sill. - Furthermore, in the
Additional componentsarea, you can add roller shutters, window surrounds, or fittings.
6. Use the 3D preview and apply settings
[07:50] View window in 3D
- In the
Generaltab, click on the3Dbutton at the bottom right. - Press and hold the left mouse button and move the mouse to view the window from all sides in the preview window.
- Click
3Dagain to close the preview.
[08:18] Apply settings
- Have you made all the settings? If so, click
OKto apply the finished window to your planning.