


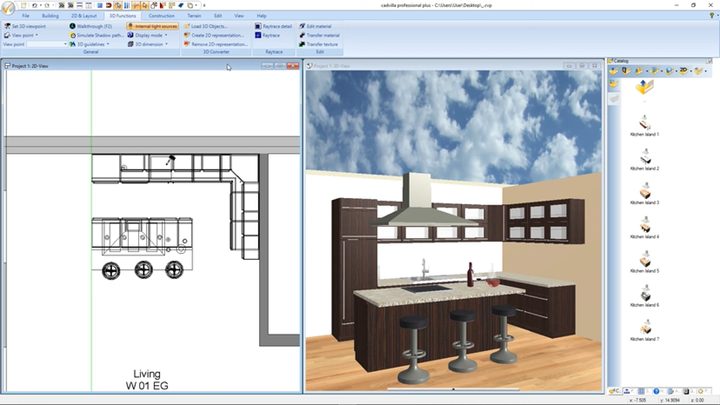
Are you looking to customize a pre-designed kitchen from the catalog to perfectly fit your floor plan? In this step-by-step video tutorial, we show you how to insert a kitchen group in cadvilla, separate it into individual objects, and completely rearrange it. You will learn how to mirror cabinets, move them precisely, delete unneeded elements, and easily transfer textures. Finally, we will group the newly designed kitchen back together for easy handling.
Note: Groups are only available from cadvilla version 9 onwards.
1. Insert kitchen from the catalog
[00:53] Select kitchenette
- Navigate on the right side in the catalog to the
Groupstab. - Open the folder structure:
Interior>Kitchen>Kitchenette>Kitchenette, type 2. - Select, for example,
Kitchenette 1with a single click. A double-click opens a preview window where you can rotate the kitchen by holding the left mouse button and zoom with the right mouse button. Confirm withOK.
[01:48] Place the kitchen in the project
- The selected
Kitchenette 1is now attached to your mouse pointer. - Drag it into the 2D view of your project and place it with a left mouse click.
- Press the
Escapekey to end the function.
2. Separate kitchen group
[02:13] Separate group into individual parts
- In order to be able to edit individual cabinets, we have to remove the grouping.
- Select the kitchen in the 2D view with a left click.
- Then click with the right mouse button to open the context menu and select
Separate group.
3. Mirror and reposition elements
[02:35] Select cabinets for mirroring
- Press
Escapeto cancel the current selection. - In the 2D view, while holding down the left mouse button, drag a selection window over the left part of the kitchen (wall and base cabinets) to select them.
[03:01] Mirror elements along an axis
- In the upper menu, select the
Mirrorfunction and thenMirror at axis. - Define the mirror axis in the 2D view: Click to enter the starting point, hold down the
CTRLkey (for an exactly vertical line), and click for the end point. The elements are now mirrored.
[03:30] Move the mirrored elements with reference point
- To place the mirrored elements (e.g., the fridge conversion) exactly against the wall, we use the
Move with reference pointfunction (shortcutR). - The kitchen elements to be moved are already selected (highlighted and shown in red).
- In the 2D view, click on a prominent corner point of the selected elements (reference point) and then click on the desired target position (on the kitchenette).
Tip: With this method, you can also slide all other cabinets (as shown from [04:23] and [06:07] in the video) precisely to their new position. Hold down the Shift key to select multiple elements simultaneously in the 3D view. Moving is always done in the 2D view.
4. Remove individual elements
[05:39] Delete unneeded cabinets
- If cabinets become superfluous due to the remodeling (e.g., duplicate wall cabinets), you can simply remove them.
- Select the corresponding cabinets in the 3D view (while holding the
Shiftkey for multiple selection). - Press the
Deletekey on your keyboard to remove the elements.
5. Add kitchen island and transfer textures
[07:35] Transfer texture of the worktop
- To create a uniform look, we transfer the gray worktop of the main kitchen to the white top of the island.
- Switch to the
3D functionstab and selectTransfer material. - First, click in the 3D view on the gray worktop of the main kitchen (source).
- Now hold down the
Shiftkey and click on the white worktop of the kitchen island (target). The texture is applied immediately.
[08:09] Place kitchen island
- Open the catalog again and navigate to
Kitchen islands. - Select a model (e.g.,
Kitchen island 2) and drag it into the 2D view holding the left mouse button.
[10:08] Delete superfluous cooktop
- Since the island already has a cooktop, select the cooktop on the island in the 3D view and delete it with the
Deletekey. (Note: The video shows deleting the cooktop from the newly inserted island, not the main kitchenette).
[10:14] Change texture of the kitchen fronts
- Repeat the process for the fronts: Switch to the
3D functionstab and selectTransfer material. - Click on the wooden front of the main kitchen (source).
- Hold down the
Shiftkey and click on the fronts of the kitchen island (target) to transfer the material. - Press
Escapeto end the process.
6. Group the new kitchen again
[11:36] Combine all elements into a group
- In order to be able to move the newly designed kitchen (including the island) as a whole later on, we combine them back into a group.
- In the 2D view, drag a large selection window over all kitchen elements.
- Select the
Groupingfunction in the upper Edit menu.
Note: You can ungroup this new group again at any time as described in step 2 if further changes are necessary.