

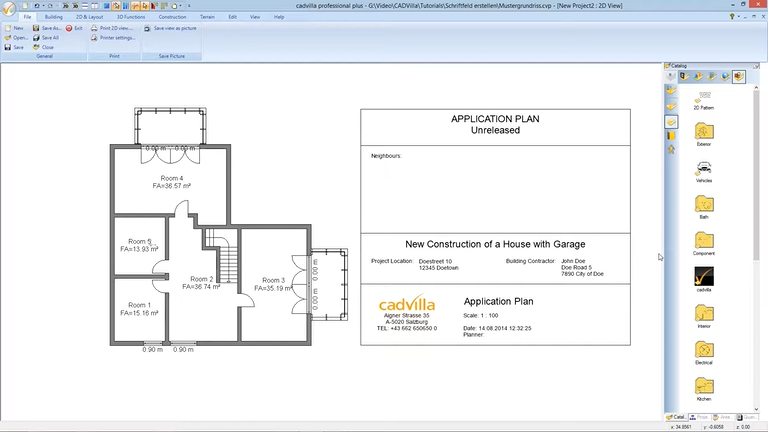
Are you looking to give your construction plans a professional and polished look? In this video tutorial, we will show you how to create your own custom title block using the cadvilla software. First, you will learn step-by-step how to draw frames, insert text and company logos, and utilize practical Autotext functions for the date or scale. Finally, you can save the finished title block as a 2D symbol, allowing you to conveniently insert it into your future projects and print it out directly.
Please note: The zoom functions demonstrated in the video are only valid up to version 5. In newer versions, you can zoom simply by scrolling the mouse wheel. For further details, please refer to our post on zooming in the 2D and 3D view.
General Information on Using a Title Block
- Important: Title blocks must always be created in the exact same scale as the plan for which they are intended. Therefore, for a plan with a scale of 1:100, you must also create the title block at a scale of 1:100.
- Furthermore, always keep a small safety distance to the edge of the title block when entering text. Consequently, the size of the texts may vary slightly during printing.
1. Create Title Block and Draw Frames
[01:12] Open a New 2D View
- First, open a new 2D view via
New viewand maximize the window. - Deactivate the grid (
Grid off) and the line width (Line width off) to be able to snap and orientate yourself better.

- Additionally, deactivate the ‘Environment’ layer in the project window on the right.
[01:43] Define the Scale
- Make a right mouse click in the view and select
Properties. - Under the
Generaltab, select the appropriate scale from theScaledropdown (e.g., 1:100) and confirm withOK.
[02:20] Set Guidelines for the Frame
- Use guidelines to define the frame and the subdivisions of the title block.
- To do this, select the functions under
2D Layout>2D guidelines>Guideline. - Start by setting a
Horizontal guidelineand aVertical guideline. - For instance, the width of the title block should be 18.5 cm. At a scale of 1:100, 18.5 cm equals 18.5 m. Consequently, to set the width of the title block, you place a
Numeric parallel guidelineexactly 18.5 m away from the vertical guideline. - In addition, define all further horizontal and vertical guidelines using the
Numeric parallel guidelinefunction to complete the guideline grid for the title block.
[06:12] Draw the Frame Lines
- To finally draw the frame, select
2D & Layout>Line>Between 2 points. - Draw the lines exactly along the guidelines you set previously.
- If drawn lines are hidden underneath the guidelines, simply select the line, right-click, and choose
Move to foregroundin the selection menu.
2. Insert Texts, Autotexts, and Images
[07:48] Add Text
- Select
2D Layout>Text>Labeling. - Click in the area where the text should be placed. The
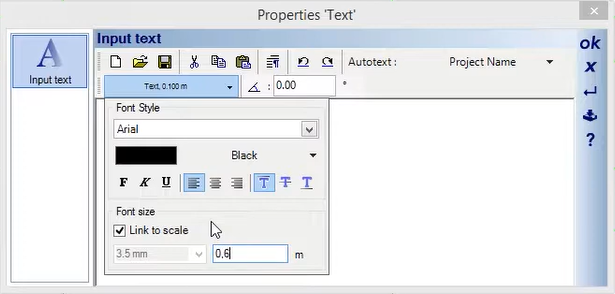
Properties Textwindow will open. - Here, you define the font,
Font size(e.g., 0.6 m for a 1:100 scale), and style. - Important: Check or uncheck the
Link to scalebox depending on whether the text size should dynamically adapt to the scale. Let’s enter the text in theInput textfield and confirm withOK.
[09:32] Position Text Exactly
- Select the text.
- To move the text, choose
Move with reference pointfrom theEdittab. - Click on a reference point (e.g., the top-left corner of the text box). Holding
CTRLwhile moving allows you to perfectly align the text vertically or horizontally to your guidelines.
[11:01] Insert an Image (e.g., Company Logo)
- Select
2D Layout>Insert bitmap>Rectangle. - Choose your logo file, confirm with
OK, and draw it as a rectangle. - To adjust the size perfectly, select the image, press the right mouse button, and select
Adjust scaling. - Furthermore, to remove the black frame around the logo, select the image, press the right mouse button, and choose
Properties. - Click the
Outlinetab and selectInvisiblefor the line type.
[16:14] Add Autotext (Example for the Scale)
- Select
2D Layout>Text>Labelingand click the desired spot. - The
Properties Textwindow opens. Set your text size and ensureLink to scaleis checked. - First, type the word
Scale:into the input text field. - Then, open the
Autotextdropdown menu, go toView, and select the entryScale. - Important: The program now inserts the variable
[$ViewScale]into the text field. Consequently, exactly in this place, the correct scale of your plan (e.g., 1:100) will automatically appear later. - Tip: Via the Autotext menu [24:00], you can also automatically insert other details (e.g., Project last changes ⇾ Date or User). Finally, confirm your entries with
OK.

3. Save Title Block as a 2D Object
[33:22] Save as Symbol File
- Select the entire title block by drawing a selection box around it.
- Press the right mouse button and select
Save selected objects as 2D symbol.... - Choose a directory, assign a name (e.g., Title_Block_1_100), and confirm with
OK. - Caution: If you save directly in the cadvilla folder, pay attention to the Windows User Account Control warning and confirm it, or alternatively, save under “My Documents”.
4. Add Title Block to a Project and Print
[35:08] Insert Title Block into the Plan
- Open your project and maximize the 2D view constraint.
- Open the
Catalogpanel on the right side and look for the2D Symbolsfolder where you saved your title block. - Select the title block with a double mouse click and place it into the 2D view.
[36:52] Edit Texts Subsequently
- To edit individual texts in the inserted title block, select it first.
- Press the right mouse button and select
2D symbols separate to base objects(or break 2D symbol into single objects). Now, you can easily edit any text element with a double click.
[38:02] Print the Project
- Open the
Filemenu (main menu) and selectPrint 2D view.
![]()
- In the
Page Setupdialog, define theSize(e.g., A3) andOrientation(e.g., Landscape). - Confirm with
OK. Subsequently, the print preview opens, perfectly displaying your plan including the completed title block.