

Welcome to our detailed tutorial on entering and customizing doors within cadvilla. First of all, we will show you how to correctly position various interior and exterior doors inside your floor plan. Furthermore, you will efficiently learn how to adjust essential item properties. These include opening dimensions, hinge sides, frames, and vivid 3D textures. Consequently, this step-by-step guide will help you create a highly professional architectural model.
Note: Starting from version 10, the fast and dimensionally accurate positioning of doors is essentially performed in the exact same manner as the quick positioning of windows.
In the following video tutorial, we will explicitly demonstrate an alternative method for entering and defining doors. Specifically, this method works smoothly by utilizing the powerful constructional support tools inside cadvilla.
Here is the basic process summarized step by step:
1. Selection and Definition of Inner Doors
[00:37] First, we begin by entering the inner doors.
- Deactivate the grid (
Grid off) and the line width (Line width off) to be able to snap and orientate yourself better.

- Navigate to the top menu and select
Building>Door>Free positioning. - Next, move your cursor into the 2D view. Then, press the
right mouse buttonand chooseProperties. - Consequently, the door dialog appears on your screen. Under the
Generaltab, click onSelect elementto choose an inner door (e.g., Inner door 2001). By clicking the 3D preview window, you can view the object instantly. - Furthermore, you must define the
Opening dimensionswithin this dialog. For example, change theWidthto 0.90 m and theHeightto 2.01 m. - Additionally, under the
Framesection, you can specify whether the door should be displayed with aBlock frameor anEnclosure trim. - After finishing the definition, simply confirm your settings by clicking
OK.
2. Placing Doors with Constructional Support
[02:28] Now, the fully configured door can be placed into the wall.
- Change reference point: To effectively change the reference point of the door (indicated by a blue circle), press the keyboard shortcut
CTRL + W. - Opening direction: During placement, an arrow indicates the opening direction. Conveniently, you can change this direction just by moving the mouse cursor within the wall.
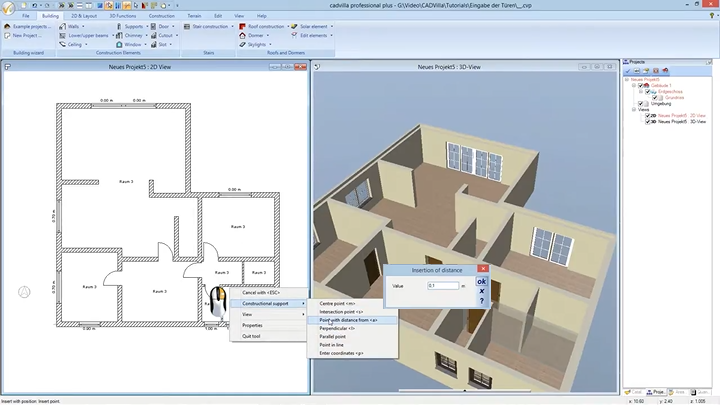
- Exact positioning: In order to place the door exactly (e.g., 0.10 m from a corner), we utilize the constructional support tools.
- While the door is attached to the cursor, press the
right mouse button. Next, selectConstructional support>Point with distance from(or simply use the shortcutA). - Afterward, click a reference point (e.g., the wall corner). Then, enter the desired value (e.g., 0.10) in the
Inversion of distancedialog and hitOK.
3. Changing the Hinge Side and Opening Direction Later
[06:48] If you made a mistake, you can always adjust doors later.
- Hinge side: To modify the hinge of an already placed door, first click the door to select it. Next, press the
right mouse buttonand selectChange opening hinge. - Opening direction: Similarly, if you want to swap the opening direction (inside/outside), select the door. Then, right-click and choose
change opening direction.
4. Adjusting the Position within the Wall (Depth)
[07:54] Sometimes, you need to change the door’s depth inside the wall (e.g., to make it flush).
- First, select the door. Afterward, press the
right mouse buttonand clickProperties. - Next, navigate to the
Openingtab. Here, you can easily adjust the value in theOuter stripfield. For instance, set it to 0.25 m on a 25 cm wall to achieve a flush finish. HitOKto confirm.
5. Material Editing and Texturing
[09:44] In order to apply textures to a door, we must switch to the 3D view.
- First, select a 3D view and zoom in accordingly.
- Then, navigate to the top tab and select
3D Functions>Edit material. - Click directly on the door to open the Material Editor. Here, you can modify the
Color(e.g., to White). Additionally, you can adjust the reflection intensity or theDiffuse portion. Confirm your changes withOK. - Finally, to duplicate this exact texture onto other doors, select
3D Functions>Transfer material. First, click on the fully textured source door. Afterward, click on all the desired target doors.
6. Adding Frames Subsequently
[12:36] If you want to add enclosure trims to doors at a later stage, follow these steps:
- Select a door in your plan. Then, press the
right mouse buttonand clickProperties. - Inside the
Generaltab, check the box forEnclosure trim. Accordingly, you can define frame widths and thicknesses. - Similarly, the material of this new frame can be customized using the
Edit materialfunction, just like the door itself.
7. Entering an Exterior Door and Texturing via Catalog
[16:15] Generally, an exterior door is inserted in a very similar manner:
- Go to
Building>Door>Free positioning. - Press the
right mouse buttonin the 2D view and selectProperties. - Choose a suitable front door from the catalog. Then, define its dimensions and confirm with
OK. - To position it perfectly in the middle, use the constructional support:
right mouse button>Constructional support>Center(between two reference points). - To texture it, you can utilize the catalog. Navigate to
3D Functions>Catalog>Textures>Colors. Simply drag and drop a preferred color onto the 3D door model. - To refine the applied texture, select
Edit material. Consequently, you can alter the color tone and its diffuse portion effortlessly.
8. Manual 2D Additions (Door Radii and Arches)
[19:36] Occasionally, manual graphic additions are necessary in the 2D plan (e.g., for special opening radii).
- First, use guidelines to construct the exact center point and radius. Go to
2D Layout>2D Guidelines>Guideline>Vertical guideline. - Afterward, select
2D Layout>Arch>Center, radius, one point. Carefully draw the arch clicking the calculated points. - Finally, you can easily supplement any missing segments. Simply select
2D Layout>Line>Between two pointsand draw the required lines.
Important Note: The helpful instructions provided in the following related articles also apply perfectly to doors. Therefore, you can use them interchangeably: