

Are you looking for an efficient way to perfectly align windows and doors in your architectural floor plans? In this comprehensive tutorial, we will show you exactly how to position windows and patio doors quickly and precisely using cadvilla. Furthermore, we will guide you through customizing opening dimensions, editing window bars, and applying realistic 3D materials. As a result, you will be able to dramatically speed up your workflow and achieve highly professional CAD models.
Additionally, please note our related article on positioning windows accurately using construction aids.

Note: The highly recommended method shown here for entering windows can, of course, also be used for entering doors.
Introduction
- The video logically begins with a brief introduction to the topic: the fast and simple placement of windows and window constructions.
- Moreover, please also check out our video on defining predefined window constructions.
1. Window Positioning in the Floor Plan
[01:15] Selecting the Window Function
- First of all, the function for inserting windows is selected via the menu
Building>Window>Window construction>Free positioning.
[01:26] Defining Window Properties
- Press the
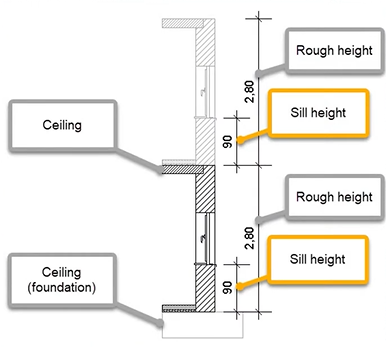
right mouse buttonon the workspace and selectPropertiesto seamlessly open the dialog for the window. - Under the
Opening dimensionssection, successfully set required measurements such as width, height, and sill height (e.g.,0.875m width,1.10m height,1.00m sill height). - Note: The sill height fundamentally refers to the top edge of the rough floor/ceiling.
[02:10] Adding Bars (Mullions)
- Click with the left mouse button directly into the window sketch and select the point
Edit barsvia theright mouse button. - Next, use the
New barbutton (plus symbol) to effortlessly add horizontal and vertical bars. The position of the bars is usually set to50%(centered). Finally, confirm your configuration withOK.
[03:10] Placing the Window
- Move the cursor to the desired position precisely on the wall. Consequently, the arrow on the window dynamically indicates the opening direction.
- Optional: The opening direction of the window is inwards by default. However, you can subsequently adjust this via the properties dialog (select window → right-click → Properties).
- Insert the window with a simple click of the left mouse button. Afterwards, press the
ESCkey several times to properly end the input mode.
[04:04] Exact Positioning using the ± Symbol ![]()
- Select the successfully placed window with the left mouse button (the corresponding measure lines are now visually displayed).
- Click directly on the ± symbol
 next to the measure line for the wall distance. Inside the newly opened
 Move openingdialog, enter the exact distance (e.g.,2.125m) and confirm withOK.
[04:36] Copying and Centering the Window
- By utilizing the keyboard shortcuts
CTRL + C(Copy) andCTRL + V(Paste), the selected window is instantly duplicated. - In order to position the new window exactly in the middle of a wall, press the shortcut
M(orright mouse button>Constructional support>Center point). Subsequently, click successively on the two inner corner points of the targeted wall.
2. Floor-to-Ceiling Windows and Patio Doors
When it comes to the positioning of floor-to-ceiling windows and patio doors, the overall process behaves quite similarly to the placement of other standard windows. In our specific case, instead of using the exterior and interior doors included in cadvilla, we utilized an existing window, appropriately adjusted it, and subsequently designated it as a door.
[10:02] Inserting Patio Doors
- Basically, patio doors are placed exactly like windows, but usually feature a sill height of 0.00 m.
- Select
Building>Window>Window construction>Free positioning, press theright mouse buttonin the 2D view, clickProperties, and choose, for example,Window, 2 casementsfrom the dropdown menu. - Define your required dimensions (e.g.,
2.00m width,2.10m height). For floor-to-ceiling windows and patio doors, the sill height must be set to0.00m.
[10:46] Bar Arrangements from the Catalog
- For the floor-to-ceiling window casements, you can select standard patterns from the catalog directly after clicking into the window sketch via
right mouse button>Edit bars. Choose aBar arrangement catalogtemplate (e.g.,1-1or2-1). - Additionally, adjust the profile values (e.g., width:
0.02m, thickness:0.012m) to perfectly match your desired aesthetic.
[15:04] Adjusting the Window Sill
- If necessary, deactivate the internal window sill under the
Window silltab by simply selectingNone. - Afterwards, patio doors are securely placed like normal windows and can be positioned exactly in the middle of the wall by using the
Center pointconstruction aid (shortcutM).
[16:32] Copying and Positioning
- Already placed patio doors can easily be copied using
CTRL + Cand pasted at completely different locations usingCTRL + V. - With the shortcut
CTRL + W, the insertion reference point of the element can be toggled to drop it perfectly into place.
3. 3D View and Texturing
[17:57] Opening the 3D View and Adjusting Colors
- Click on
3Din the top icon bar to quickly open a new 3D view. - Alternatively, to directly apply a uniform color (e.g., White) to all windows and doors, select
3D Functions>Edit materialand define the color clearly in the dialog. - Using the standard catalog structure (
Catalog>Textures>Colors), you can adapt windows visually by dragging the desired color directly onto the 3D window while holding the left mouse button.
[19:38] Transferring Material
- Utilize the
3D Functions>Transfer materialfunction to streamline your work. First, click on the white window (as your source) and subsequently click on all other windows and doors to directly apply the color.
[20:08] Adjusting Light Sources
- In order to strongly optimize the representation within the 3D view, right-click on the
3D Functions>Internal light sourcesoption. - Adjust the lighting intensities accurately (e.g.,
40.0% for the sun,70.0% for the ambient light) and successfully confirm withOK.
4. Adding Door Radii – Only Necessary for French Doors
When using the doors already included in cadvilla, the door radius is automatically displayed in the 2D top view (please also refer to the video regarding entering doors with construction aids). However, because the patio doors we used here are structurally floor-to-ceiling windows, the program understandably does not show the door radius automatically. Therefore, you must add it manually.
[21:02] Creating Guidelines
- Switch directly back into the 2D view and select
2D & Layout>2D Guidelines>Guideline. - Effectively use the
Vertical guideline(shortcutG) andNumeric parallel guideline(shortcutP) to draw a highly precise grid for the door radii (e.g., exactly at a1.00m distance).
[22:12] Inserting Radii
- Select the function
2D & Layout>Arch>Center radius one point. - First, click exactly on the center point (the intersection of your guidelines). Next, click on the starting point, and finally on the end point of the arch to cleanly create the door radius. Repeat this straightforward process for any additional doors.
[23:42] Copying the Radii (Optional)
- To quickly transfer an already created door radius, select it, press the key combination
CTRL+Cto safely copy it, and then paste it at the desired location using the key combinationCTRL+V.