


In this video, you will learn step by step how to adjust room labels, visualize area calculations directly in the floor plan, and export standard-compliant reports (living space and volume calculations) as PDFs. Please note that some of the functions shown in this video tutorial are only included in the cadvilla professional & cadvilla professional plus product versions.
The numbers in brackets indicate the respective jump times in the video.
Please note: The zoom functions demonstrated in the video are only valid up to version 5. In newer versions, you can zoom simply by scrolling the mouse wheel. For further details, please refer to our post on zooming in the 2D and 3D view.
1. Adjust room labels (Basics)
To display specific area values directly in the floor plan, adjust the properties of the room.
- [01:31] Select room: Select the room in the 2D view > Right-click >
Properties. - [01:31] Configure labelling: Navigate to the
Labellingtab. Here you can check the boxes for:- [01:44] Floor area: The complete geometric floor area of the room.
- [02:13] Net floor area: Subdivided into areas
<= 1.5mand> 1.5mroom height (relevant for roof pitches). - [02:52] Living area: Takes into account deductions due to roof pitches and wall paneling.
- [01:44] Prefix: You can put your own abbreviations (e.g., “LA=”) in the
Prefixfield in front of the values, which will then appear in the plan. - [03:00] Result: After confirming with
OK, you will see all selected values listed below each other in the floor plan.
2. Visual representation of the area calculation
A special feature of cadvilla is the colored visualization of the different area types directly in the 2D floor plan and the 3D view.
- [05:29] Activation: Open the
Area calculationtab in the right-hand panel underProjects. - [05:29] Select range: Determine the floor (e.g.,
Upper floor) underRangefor which the calculation should be displayed. - [05:42] Select area type: Under
Selection, check the desired type (e.g.,Floor area).- Effect: The software colors the corresponding areas and displays the square meter number large in the room. The coloring of the areas works in a 2D view as well as in a 3D view. For the sake of clarity, the square meter numbers are only additionally displayed in the 2D view.
- [06:53] Living area & roof pitches: Select
Living area.- You immediately see which areas are not calculated (white) or only partially calculated due to the roof pitch.
- [07:13] Wall paneling: The plaster deduction (e.g., 1 cm) is also visually represented as a fine white border on the walls.
- [08:25] Visualize Net floor area: You can specifically display only the areas that are under 1.50 m room height by selecting
Net floor area < 1.5m(often relevant for storage areas).
The visual views of the area calculation can also be printed and, for example, attached to the living space calculation. (See Printing a 2D view / Saving an image of a 3D view)
3. Create and print reports (PDF export)
For building applications or exposés, you can generate detailed lists. The lists can be output in various formats:
- PDF Document (*.pdf)
- HTML files (*.htm, *.html)
- Excel table (*.xls)
- Rich Text Format (*.rtf) … for example for editing in Word
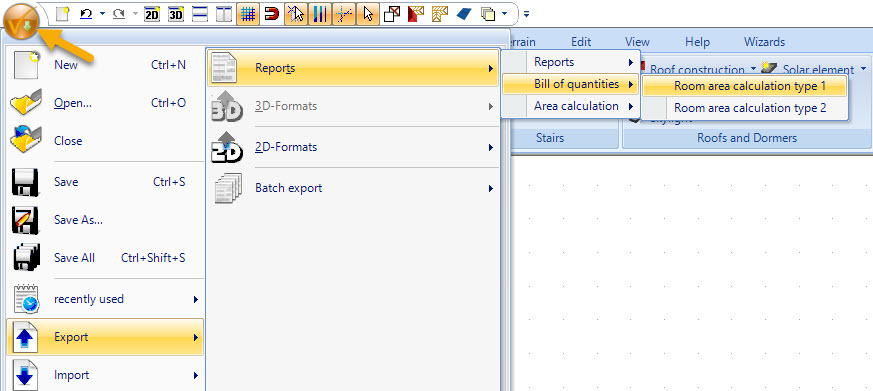
Living space calculation (Type 1):
- [10:25] Menu path: Go to the
Filetop menu >Export>Reports>Bill of quantities>Room area calculation type 1. - [11:05] Export: Confirm the settings in the export window, choose a location in the
Save Report file aswindow, selectPDF Document (*.pdf), and save the file. - [11:36] Result: You receive a list with all rooms, deduction areas (roof pitches), and the final living area.
Volume calculation (Type 2):
- [12:16] Menu path: Go to the
Fileto menu >Export>Reports>Bill of quantities>Room area calculation type 2. - [12:39] Export: Confirm the settings and save the file as a PDF.
- [13:17] Result: The PDF contains the volume calculations, neatly broken down by room and total building volume.